<?xml version="1.0" encoding="utf-8"?><feed xmlns="http://www.w3.org/2005/Atom" ><generator uri="https://jekyllrb.com/" version="4.4.1">Jekyll</generator><link href="https://www.radamczyk.com/feed.xml" rel="self" type="application/atom+xml" /><link href="https://www.radamczyk.com/" rel="alternate" type="text/html" /><updated>2026-08-11T17:56:12+00:00</updated><id>https://www.radamczyk.com/feed.xml</id><title type="html">Ryan Adamczyk</title><subtitle>A personal blog and resume for Ryan Adamczyk</subtitle><author><name>Ryan Adamczyk</name><email>me@ryanadamczyk.com</email></author><entry><title type="html">Ubuntu 22.04 LTS NIST 800-171 Configuration</title><link href="https://www.radamczyk.com/2025-05-29/Ubuntu-22-04-LTS-NIST-800-171-Configuration" rel="alternate" type="text/html" title="Ubuntu 22.04 LTS NIST 800-171 Configuration" /><published>2025-05-29T09:00:00+00:00</published><updated>2025-05-29T09:00:00+00:00</updated><id>https://www.radamczyk.com/2025-05-29/Ubuntu-22-04-LTS-NIST-800-171-Configuration</id><content type="html" xml:base="https://www.radamczyk.com/2025-05-29/Ubuntu-22-04-LTS-NIST-800-171-Configuration"><![CDATA[<blockquote class="post-notice">
  <p><strong>Scope note:</strong> This walkthrough documents a version-specific, FAU-assigned configuration project. It does not demonstrate organizational NIST SP 800-171 compliance. Validate the current STIG, tooling, operating-system support, and your organization’s requirements before using any step in production.</p>
</blockquote>

<h2 id="nist-800-171">NIST 800-171</h2>
<p>NIST Special Publication 800-171, titled “Protecting Controlled Unclassified Information in Non-Federal Systems and Organizations,” is a document published by the National Institute of Standards and Technology (NIST), aimed at standardizing the way non-federal entities protect sensitive but unclassified information.</p>

<p>The publication outlines 14 families of security requirements that aim to secure Controlled Unclassified Information (CUI) when it is stored, processed, or transmitted by non-federal systems and organizations.</p>

<h3 id="14-families-of-security-requirements">14 Families of Security Requirements</h3>
<ul>
  <li>Access Control
    <ul>
      <li>Restricting access to CUI through the enforcement of access permissions.</li>
    </ul>
  </li>
  <li>Awareness and Training
    <ul>
      <li>Ensuring that organizational personnel are adequately trained and aware of security risks.</li>
    </ul>
  </li>
  <li>Audit and Accountability
    <ul>
      <li>Creating and retaining system audit logs and records to the extent needed to enable the monitoring, analysis, investigation, and reporting of unlawful or unauthorized system activity.</li>
    </ul>
  </li>
  <li>Configuration Management
    <ul>
      <li>Establishing and maintaining the integrity of organizational systems by applying security configurations and monitoring changes.</li>
    </ul>
  </li>
  <li>Identification and Authentication
    <ul>
      <li>Ensuring the identity of users and processes that access organizational systems.</li>
    </ul>
  </li>
  <li>Incident Response
    <ul>
      <li>Establishing an operational incident handling capability for organizational systems.</li>
    </ul>
  </li>
  <li>Maintenance
    <ul>
      <li>Performing timely maintenance of organizational systems.</li>
    </ul>
  </li>
  <li>Media Protection
    <ul>
      <li>Protecting system media containing CUI, both paper and digital.</li>
    </ul>
  </li>
  <li>Physical Protection
    <ul>
      <li>Limiting physical access to organizational systems and the facilities in which they are housed.</li>
    </ul>
  </li>
  <li>Personnel Security
    <ul>
      <li>Ensuring that individuals occupying positions of responsibility within organizations are trustworthy and meet established security criteria.</li>
    </ul>
  </li>
  <li>Risk Assessment
    <ul>
      <li>Conducting assessments of risks to organizational operations, assets, and individuals.</li>
    </ul>
  </li>
  <li>Security Assessment
    <ul>
      <li>Assessing the security controls in organizational systems to determine their effectiveness.</li>
    </ul>
  </li>
  <li>System and Communications Protection
    <ul>
      <li>Monitoring, controlling, and protecting organizational communications at the external boundaries and key internal boundaries of information systems.</li>
    </ul>
  </li>
  <li>System and Information Integrity
    <ul>
      <li>Identifying, reporting, and correcting information and information system flaws in a timely manner.</li>
    </ul>
  </li>
</ul>

<h3 id="overview-of-the-build-steps">Overview of the Build Steps</h3>
<ol>
  <li>Install fresh Ubuntu 22.04 LTS system</li>
  <li>Preconfigure the system for compliance</li>
  <li>Run SCAP agent against OS</li>
  <li>Collect results to compare and define steps needed for compliance</li>
  <li>Run SCAP for verification</li>
  <li>Fix the non-compliant issues</li>
  <li>Repeat steps 3 through 6 as needed</li>
</ol>

<h3 id="fresh-ubuntu-2204-lts-installation">Fresh Ubuntu 22.04 LTS Installation</h3>
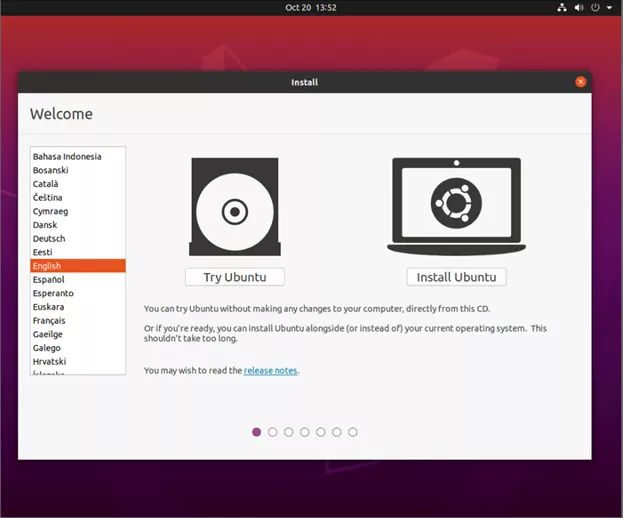
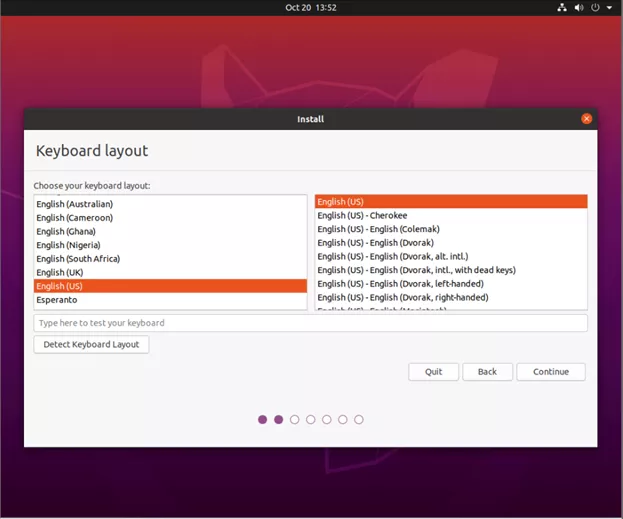
<p>1. Install Ubuntu 22.04 via DVD, ISO, or USB</p>

<p><img src="/assets/img/posts/ubuntu_install_1.webp" alt="ubuntu_install_1" /></p>

<p><img src="/assets/img/posts/ubuntu_install_2.webp" alt="ubuntu_install_2" /></p>

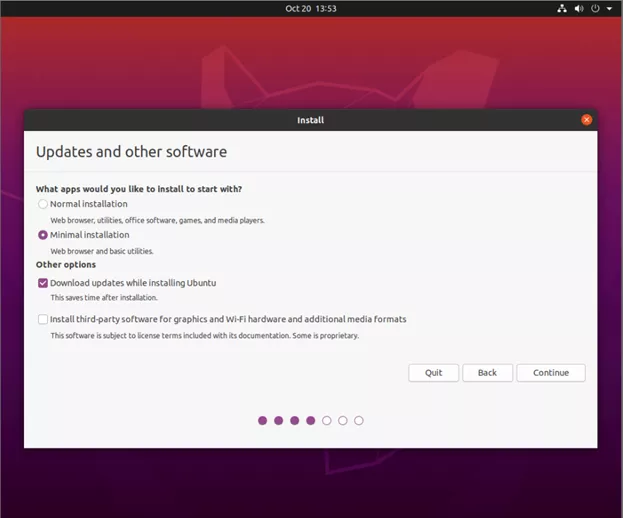
<p>2. If an internet connection is available, choose <strong>Download updates while installing Ubuntu</strong>. Also choose <strong>Install third-party software for graphics…</strong> if specialized drivers are needed for hardware.</p>

<p><img src="/assets/img/posts/ubuntu_install_3.webp" alt="ubuntu_install_3" /></p>

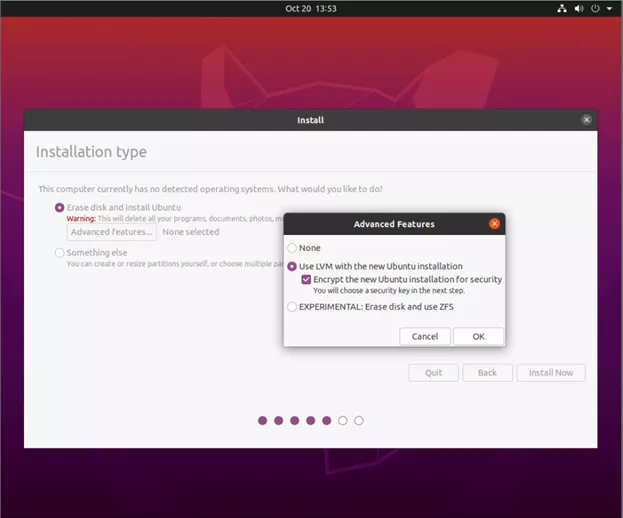
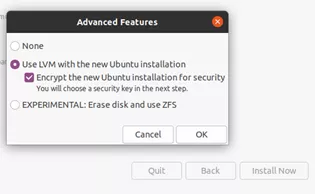
<p>3. If there is only one drive in the system, use the default setting to configure the drive and choose <strong>Advanced Features</strong> to enable LVM with encryption. Otherwise, configure the partitions and encrypted volumes under <strong>Something Else</strong>.</p>

<p><img src="/assets/img/posts/ubuntu_install_4.webp" alt="ubuntu_install_4" /></p>

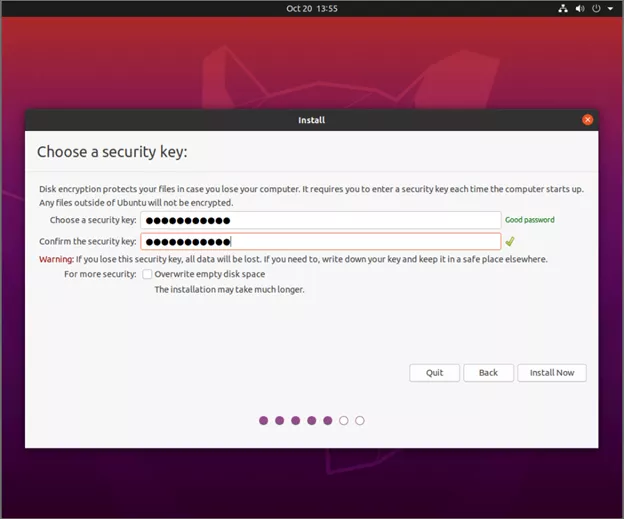
<p>4. In the LVM/Encryption screen, enter a very long complex password that will be used to encrypt the drive. The password should be at least 16 characters long. Store the password in a secured place.
    - <strong>Note</strong>: Once TPM boot is configured, the encryption password will only be used for emergency recovery.</p>

<p><img src="/assets/img/posts/ubuntu_install_5.webp" alt="ubuntu_install_5" /></p>

<p>5. Choose <strong>Install Now</strong> once storage is configured. Next, choose <strong>Continue</strong> to write changes to disks.<img src="/assets/img/posts/ubuntu_install_6.webp" alt="ubuntu_install_6" /></p>

<p>6. Choose the correct time zone for the system.</p>

<p><img src="/assets/img/posts/ubuntu_install_7.webp" alt="ubuntu_install_7" /></p>

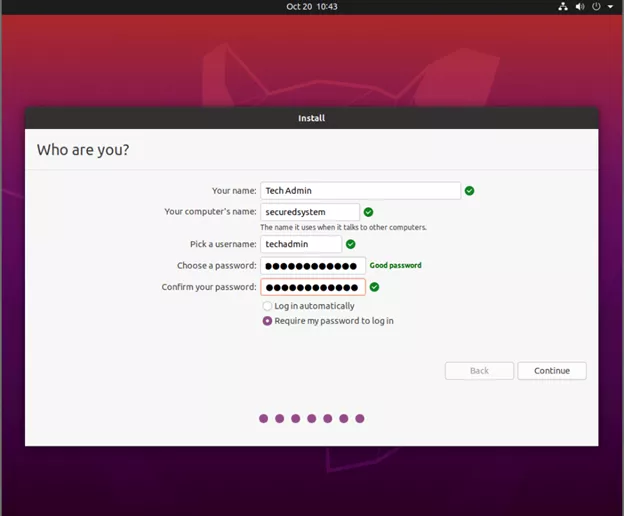
<p>7. The account created at this step will be used as the <strong>Local Admin</strong> account for the system. The computer name is also entered here, following the standards required for the group.</p>

<p><img src="/assets/img/posts/ubuntu_install_8.webp" alt="ubuntu_install_8" /></p>

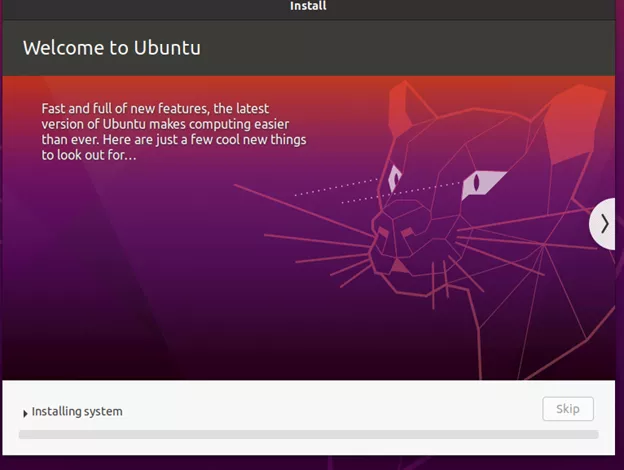
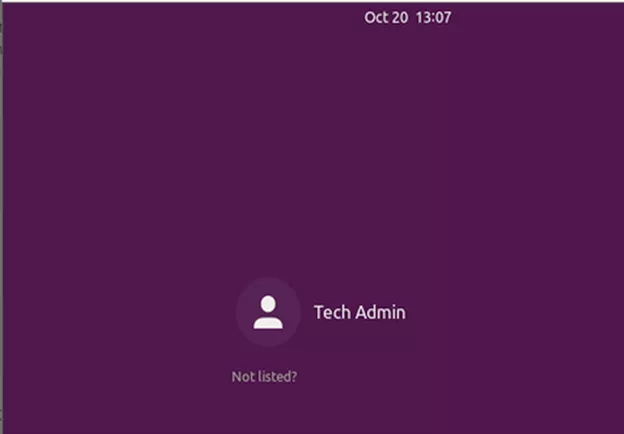
<p>8. The system wil begin the install. Once completed, allow it to reboot.</p>

<p><img src="/assets/img/posts/ubuntu_install_9.webp" alt="ubuntu_install_9" /></p>

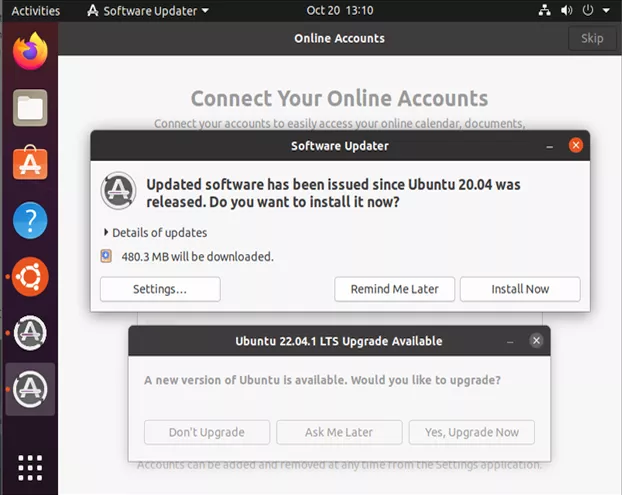
<p>9. Do not upgrade or update the system at this point. Upgrading will change the system to version 24.04, which is not supported in this guide. The <strong>Software Updater</strong> will not add the necessary features needed. Choose <strong>Remind Me Later</strong> and <strong>Don’t Upgrade</strong>.</p>

<p><img src="/assets/img/posts/ubuntu_install_10.webp" alt="ubuntu_install_10" /></p>

<p>10. Press <strong>Skip</strong> to continue the installation process.</p>

<p><img src="/assets/img/posts/ubuntu_install_11.webp" alt="ubuntu_install_11" /></p>

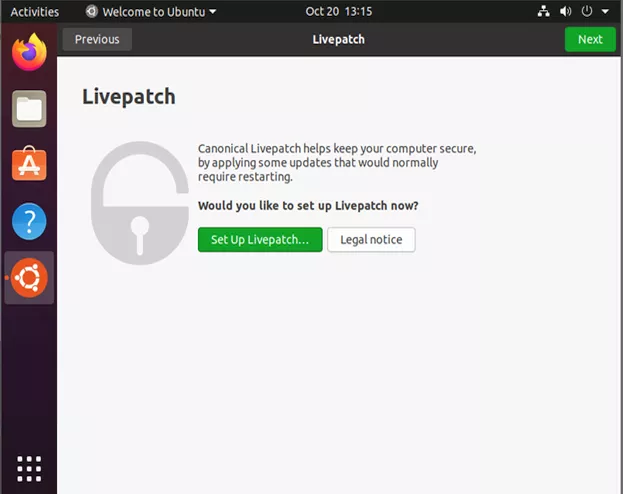
<p>11. Click <strong>Next</strong> to skip the Livepath option, if the system does not have a Canonical license.</p>

<p><img src="/assets/img/posts/ubuntu_install_12.webp" alt="ubuntu_install_12" /></p>

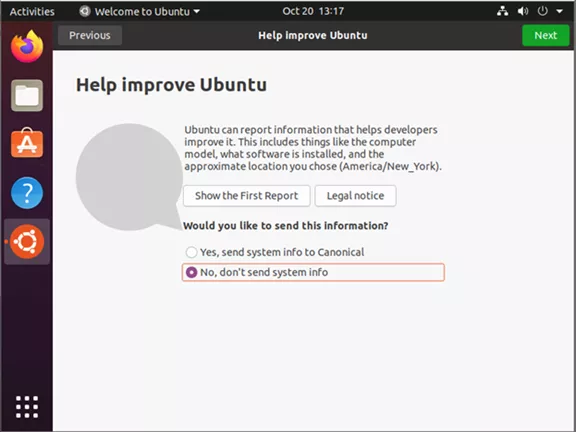
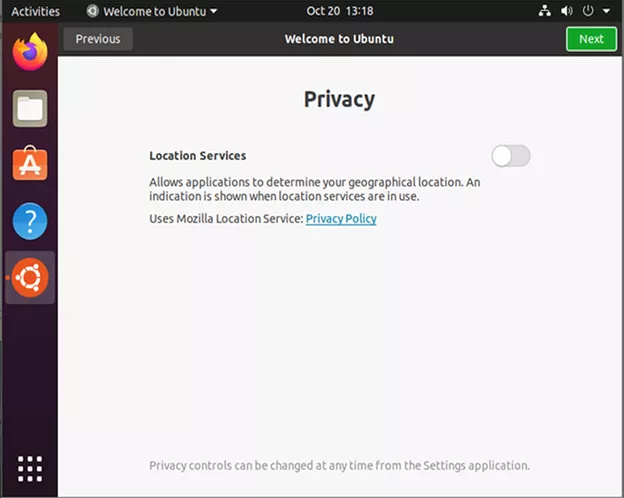
<p>12. Click <strong>No</strong> and then <strong>Next</strong> to avoid sending information to Canonical. Click <strong>Next</strong> and leave location servic disabled. Next, click <strong>Done</strong>.</p>

<p><img src="/assets/img/posts/ubuntu_install_13.webp" alt="ubuntu_install_13" /></p>

<h3 id="prep-system-for-hardening">Prep System for Hardening</h3>
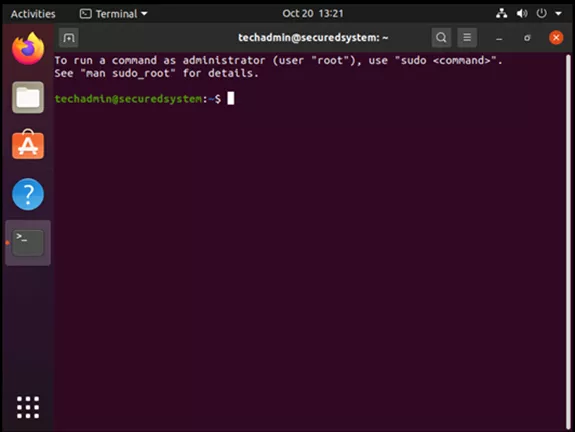
<p>13. Click the <strong>Show Applications</strong> button on the lower left and type in <strong>Terminal</strong> to start the application.</p>

<p><img src="/assets/img/posts/ubuntu_hardening_1.webp" alt="ubuntu_hardening_1" /></p>

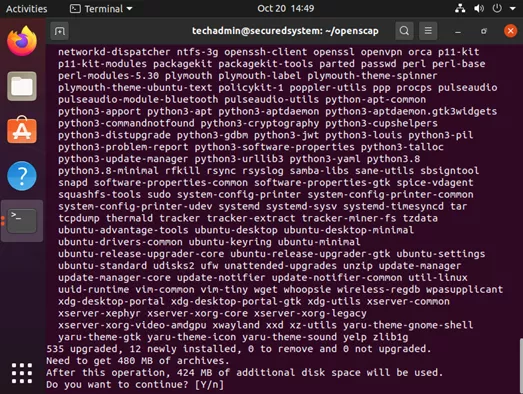
<p>14. Update the system files and upgrade any files.
    - <strong>Note</strong>: Most of the following commands will require <strong>SUDO</strong> mode</p>
<div class="language-bash highlighter-rouge"><div class="highlight"><pre class="highlight"><code><span class="nb">sudo </span>apt update
<span class="nb">sudo </span>apt upgrade
</code></pre></div></div>

<p><img src="/assets/img/posts/ubuntu_hardening_2.webp" alt="ubuntu_hardening_2" /></p>

<p>15. Install the following packages needed for hardening, then remove old packages.</p>

<ul>
  <li><strong>Note</strong>: For postfix options, choose the option <strong>Local Installation</strong> and name the current computer name the same as the DNS name.</li>
</ul>

<div class="language-bash highlighter-rouge"><div class="highlight"><pre class="highlight"><code><span class="nb">sudo </span>apt <span class="nb">install </span>libopenscap8 vlock libpam-pkcs11 libpam-pwquality opensc-pkcs11 chrony clamav unattended-upgrades auditd aide
<span class="nb">sudo </span>apt autoremove
</code></pre></div></div>
<p>16. Install OpenSSH server if remote access to the system is required.</p>
<ul>
  <li><strong>Note</strong>: This step must be done before the hardening script below in order to make sure that hardening steps are applied.
    <div class="language-bash highlighter-rouge"><div class="highlight"><pre class="highlight"><code><span class="nb">sudo </span>apt <span class="nb">install </span>openssh-server
</code></pre></div>    </div>
  </li>
</ul>

<p>17. Set the login notification messages for local and remote logins.</p>
<div class="language-bash highlighter-rouge"><div class="highlight"><pre class="highlight"><code><span class="nb">echo</span> <span class="s1">'You are accessing a system that is provided for authorized use only. By using this system, you consent to the acceptable use policy.'</span> <span class="o">&gt;&gt;</span> /etc/issue
<span class="nb">echo</span> <span class="s1">'You are accessing a system that is provided for authorized use only. By using this system, you consent to the acceptable use policy.'</span> <span class="o">&gt;</span> /etc/issue.net
</code></pre></div></div>

<p>18. Set the timeout, login notification messages, and USB mount handling for the GUI session</p>
<ul>
  <li><strong>Note</strong>: this is specifically for the GDM session manager. Research will be needed to change the setting for KDE or other managers. They are not needed if the system does not have a GUI. These commands must be run in a terminal session of the GUI to work properly.
    <div class="language-bash highlighter-rouge"><div class="highlight"><pre class="highlight"><code><span class="nb">sudo</span> <span class="nt">-i</span>
xhost +SI:localuser:gdm
<span class="nb">sudo</span> <span class="nt">-u</span> gdm gsettings <span class="nb">set </span>org.gnome.login-screen disable-user-list <span class="nb">true
sudo</span> <span class="nt">-u</span> gdm gsettings <span class="nb">set </span>org.gnome.login-screen banner-message-enable <span class="nb">true
sudo</span> <span class="nt">-u</span> gdm gsettings <span class="nb">set </span>org.gnome.login-screen banner-message-text <span class="s1">'You are accessing a system that is provided for authorized use only. By using this system, you consent to the acceptable use policy.'</span>
<span class="nb">sudo</span> <span class="nt">-u</span> gdm gsettings <span class="nb">set </span>org.gnome.desktop.media-handling automount <span class="nb">false
exit</span>
</code></pre></div>    </div>
  </li>
</ul>

<h3 id="dod-stig-based-fixes">DoD STIG Based Fixes</h3>
<ul>
  <li>Fixes from v18.04
    <ul>
      <li>rule_sysctl_fs_suid_dumpable</li>
      <li>rule_sysctl_kernel_randomize_va_space</li>
    </ul>
  </li>
  <li>DoD STIGs</li>
  <li>xccdf_mil.disa.stig_rule_SV-238202r653781_rule
    <ul>
      <li>Set password rules</li>
    </ul>
  </li>
  <li>xccdf_mil.disa.stig_rule_SV-238209r653802_rule
    <ul>
      <li>Change permissions on rule file</li>
    </ul>
  </li>
  <li>xccdf_mil.disa.stig_rule_SV-238210r653805_rule</li>
  <li>xccdf_mil.disa.stig_rule_SV-238210r653805_rule (SSH)</li>
  <li>xccdf_mil.disa.stig_rule_SV-238212r653811_rule</li>
  <li>xccdf_mil.disa.stig_rule_SV-238213r653814_rule</li>
  <li>xccdf_mil.disa.stig_rule_SV-238216r654316_rule</li>
  <li>xccdf_mil.disa.stig_rule_SV-238217r832940_rule</li>
  <li>xccdf_mil.disa.stig_rule_SV-238218r653829_rule</li>
  <li>xccdf_mil.disa.stig_rule_SV-238219r653832_rule</li>
  <li>xccdf_mil.disa.stig_rule_SV-238220r653835_rule</li>
  <li>xccdf_mil.disa.stig_rule_SV-238221r653838_rule</li>
  <li>xccdf_mil.disa.stig_rule_SV-238222r653841_rule</li>
  <li>xccdf_mil.disa.stig_rule_SV-238223r653844_rule</li>
  <li>xccdf_mil.disa.stig_rule_SV-238226r653853_rule</li>
  <li>xccdf_mil.disa.stig_rule_SV-238225r832942_rule</li>
  <li>xccdf_mil.disa.stig_rule_SV-238227r653856_rule</li>
  <li>xccdf_mil.disa.stig_rule_SV-238228r653859_rule</li>
  <li>xccdf_mil.disa.stig_rule_SV-238237r653886_rule</li>
  <li>xccdf_mil.disa.stig_rule_SV-238357r654246_rule</li>
  <li>xccdf_mil.disa.stig_rule_SV-238201r832933_rule</li>
  <li>xccdf_mil.disa.stig_rule_SV-238249r653922_rule</li>
  <li>xccdf_mil.disa.stig_rule_SV-238250r653925_rule</li>
  <li>xccdf_mil.disa.stig_rule_SV-238251r653928_rule</li>
  <li>xccdf_mil.disa.stig_rule_SV-238330r654165_rule
    <ul>
      <li>Disable accounts after 60 days</li>
    </ul>
  </li>
  <li>xccdf_mil.disa.stig_rule_SV-238337r654186_rule</li>
  <li>xccdf_mil.disa.stig_rule_SV-238340r654195_rule
    <ul>
      <li>Harden log files</li>
    </ul>
  </li>
</ul>

<p><strong>Note</strong>:</p>
<ul>
  <li>“xccdf_mil.disa.stig_rule_SV-238363r654320_rule” cannot be configured without a Ubuntu subscription. However, this documentation activates and forces FIPS level encryption</li>
  <li>“xccdf_mil.disa.stig_rule_SV-238330r654165_rule” is configured by the script to 60 days as opposed to the DOD documentation of 180</li>
</ul>

<p>19. Run the following fixes <strong>as root</strong> to manually resolve STIG rules based on the rules listed above</p>
<div class="language-bash highlighter-rouge"><div class="highlight"><pre class="highlight"><code><span class="nb">sudo </span>bash
<span class="nb">sudo echo</span> <span class="s1">'fs.suid_dumpable = 0'</span> <span class="o">&gt;&gt;</span> /etc/sysctl.d/10-kernel-hardening.conf
<span class="nb">sudo echo</span> <span class="s1">'kernel.randomize_va_space = 2'</span> <span class="o">&gt;&gt;</span> /etc/sysctl.d/10-kernel-hardening.conf
<span class="nb">sudo sed</span> <span class="nt">-i</span> <span class="s1">'s/PASS_MIN_DAYS.*0/PASS_MIN_DAYS 1/g'</span> /etc/login.defs
<span class="nb">sudo sed</span> <span class="nt">-i</span> <span class="s1">'s/PASS_MAX_DAYS.*99999/PASS_MAX_DAYS 60/g'</span> /etc/login.defs
<span class="nb">sudo sed</span> <span class="nt">-i</span> <span class="s1">'s/UMASK.*022/UMASK 077/g'</span> /etc/login.defs
<span class="nb">sudo sed</span> <span class="nt">-i</span> <span class="s1">'s/end of pam-auth-update config/\nFIX xccdf_mil\.disa\.stig_rule_SV-238210r653805/g'</span> /etc/pam.d/common-auth
<span class="nb">sudo echo</span> <span class="s1">'auth [success=2 default=ignore] pam_pkcs11.so'</span> <span class="o">&gt;&gt;</span>  /etc/pam.d/common-auth
<span class="nb">sudo echo</span> <span class="s1">'end of pam-auth-update config'</span> <span class="o">&gt;&gt;</span>  /etc/pam.d/common-auth
<span class="nb">sudo echo</span> <span class="s1">'PubkeyAuthentication yes'</span> <span class="o">&gt;&gt;</span> /etc/ssh/sshd_config
<span class="nb">sudo echo</span> <span class="s1">'Ciphers aes256-ctr,aes192-ctr,aes128-ctr'</span> <span class="o">&gt;&gt;</span> /etc/ssh/sshd_config
<span class="nb">sudo echo</span>  <span class="s1">'MACs hmac-sha2-512,hmac-sha2-256'</span> <span class="o">&gt;&gt;</span> /etc/ssh/sshd_config
<span class="nb">sudo echo</span> <span class="s1">'ClientAliveCountMax 1'</span> <span class="o">&gt;&gt;</span> /etc/ssh/sshd_config
<span class="nb">sudo echo</span> <span class="s1">'ClientAliveInterval 600'</span> <span class="o">&gt;&gt;</span> /etc/ssh/sshd_config
<span class="nb">sudo echo</span> <span class="s1">'PermitEmptyPasswords no'</span> <span class="o">&gt;&gt;</span> /etc/ssh/sshd_config
<span class="nb">sudo echo</span> <span class="s1">'PermitUserEnvironment no'</span> <span class="o">&gt;&gt;</span> /etc/ssh/sshd_config
<span class="nb">sudo sed</span> <span class="nt">-i</span> <span class="s1">'s/X11Forwarding\ yes/X11Forwarding\ no/g'</span> etc/ssh/sshd_config
<span class="nb">sudo echo</span> <span class="s1">'X11UseLocalhost yes'</span> <span class="o">&gt;&gt;</span> /etc/ssh/sshd_config
<span class="nb">sudo echo</span> <span class="s1">'ucredit=-1'</span> <span class="o">&gt;&gt;</span> /etc/security/pwquality.conf
<span class="nb">sudo echo</span> <span class="s1">'lcredit=-1'</span> <span class="o">&gt;&gt;</span> /etc/security/pwquality.conf
<span class="nb">sudo echo</span> <span class="s1">'dcredit=-1'</span> <span class="o">&gt;&gt;</span> /etc/security/pwquality.conf
<span class="nb">sudo echo</span> <span class="s1">'ocredit=-1'</span> <span class="o">&gt;&gt;</span> /etc/security/pwquality.conf
<span class="nb">sudo echo</span> <span class="s1">'difok=8'</span> <span class="o">&gt;&gt;</span> /etc/security/pwquality.conf
<span class="nb">sudo echo</span> <span class="s1">'minlen=15'</span> <span class="o">&gt;&gt;</span> /etc/security/pwquality.conf
<span class="nb">sudo echo</span> <span class="s1">'dictcheck=1'</span> <span class="o">&gt;&gt;</span> /etc/security/pwquality.conf
<span class="nb">sudo echo</span> <span class="s1">'enforcing=1'</span> <span class="o">&gt;&gt;</span> /etc/security/pwquality.conf
<span class="nb">sudo echo</span> <span class="s1">'auth required pam_faildelay.so delay=4000000'</span> <span class="o">&gt;&gt;</span> /etc/pam.d/common-auth
<span class="nb">sudo     sudo sed</span> <span class="nt">-i</span> <span class="s1">'s/makestep\ 1\ 3/makestep\ 1\ -1/g'</span> /etc/chrony/chrony.conf
<span class="nb">sudo cp</span> /usr/share/doc/libpam-pkcs11/examples/pam_pkcs11.conf.example /etc/pam_pkcs11/pam_pkcs11.conf
<span class="nb">sudo chmod</span> <span class="nt">-R</span> 0640 /etc/audit/audit<span class="k">*</span>.<span class="o">{</span>rules,conf<span class="o">}</span> /etc/audit/rules.d/<span class="k">*</span>
<span class="nb">sudo chown </span>root /etc/audit/audit<span class="k">*</span>.<span class="o">{</span>rules,conf<span class="o">}</span> /etc/audit/rules.d/<span class="k">*</span>
<span class="nb">sudo </span>useradd <span class="nt">-D</span> <span class="nt">-f</span> 60
<span class="nb">sudo </span>find /var/log <span class="nt">-perm</span> /137 <span class="nt">-type</span> f <span class="nt">-exec</span> <span class="nb">chmod </span>640 <span class="s1">'{}'</span> <span class="se">\;</span>
<span class="nb">sudo chmod </span>0750 /var/log
</code></pre></div></div>

<h3 id="openscap-configuration-and-fix">OpenSCAP Configuration and Fix</h3>
<p>20. Create a folder to hold the guides and configuration scripts. Then, download the Ubuntu SCAP guide from the DoD website. Unzip the downloaded file.</p>
<div class="language-bash highlighter-rouge"><div class="highlight"><pre class="highlight"><code><span class="nb">mkdir </span>openscap
<span class="nb">cd </span>openscap
wget https://dl.dod.cyber.mil/wp-content/uploads/stigs/zip/U_CAN_Ubuntu_22-04_LTS_V2R2_STIG_SCAP_1-3_Benchmark.zip
unzip U_CAN_Ubuntu_22-04_LTS_V2R2_STIG_SCAP_1-3_Benchmark.zip
</code></pre></div></div>
<p>21. Create a preliminary report and result file using the DoD STIG profile.</p>
<div class="language-bash highlighter-rouge"><div class="highlight"><pre class="highlight"><code>oscap xccdf <span class="nb">eval</span> <span class="se">\</span>
<span class="nt">--profile</span> xccdf_mil.disa.stig_profile_MAC-2_Sensitive <span class="se">\</span>
<span class="nt">--fetch-remote-resources</span> <span class="se">\</span>
<span class="nt">--results</span> openscap_NIST800171_results-install_<span class="si">$(</span><span class="nb">date</span> +%Y%m%d_%H%M%S<span class="si">)</span>.xml <span class="se">\</span>
<span class="nt">--report</span> openscap_NIST800171_report_<span class="si">$(</span><span class="nb">date</span> +%Y%m%d_%H%M%S<span class="si">)</span><span class="nt">-pre</span>.html <span class="se">\</span>
U_CAN_Ubuntu_22-04_LTS_V2R2_STIG_SCAP_1-3_Benchmark.xml

</code></pre></div></div>

<p>22. Generate a fix file using the previously generated results file.</p>
<div class="language-bash highlighter-rouge"><div class="highlight"><pre class="highlight"><code><span class="nb">sudo </span>oscap xccdf generate fix <span class="se">\</span>
<span class="nt">--fix-type</span> bash <span class="se">\</span>
<span class="nt">--profile</span> xccdf_mil.disa.stig_profile_MAC-2_Sensitive <span class="se">\</span>
U_CAN_Ubuntu_22-04_LTS_V2R2_STIG_SCAP_1-3_Benchmark.xml <span class="se">\</span>
<span class="o">&gt;</span> openscap_NIST800171-fix.sh

</code></pre></div></div>

<p>23. Run the generated fix file in a root environment.</p>
<div class="language-bash highlighter-rouge"><div class="highlight"><pre class="highlight"><code><span class="nb">sudo </span>bash
sh ./openscap_NIST800171-fix.sh
<span class="nb">exit</span>
</code></pre></div></div>

<p>24. Generate a “post fix” report to find what fixes require manual modifications</p>
<div class="language-bash highlighter-rouge"><div class="highlight"><pre class="highlight"><code>oscap xccdf <span class="nb">eval</span> <span class="se">\</span>
<span class="nt">--profile</span> xccdf_mil.disa.stig_profile_MAC-2_Sensitive <span class="se">\</span>
<span class="nt">--fetch-remote-resources</span> <span class="se">\</span>
<span class="nt">--report</span> openscap_NIST800171_report_<span class="si">$(</span><span class="nb">date</span> +%Y%m%d<span class="si">)</span><span class="nt">-post</span>.html <span class="se">\</span>
U_CAN_Ubuntu_22-04_LTS_V2R2_STIG_SCAP_1-3_Benchmark.xml

</code></pre></div></div>

<h3 id="manual-fixes">Manual Fixes</h3>
<p>The “openscap_NIST800171_report_XXXXXX-post.html” file that is generated is a HTML file that can be viewed in Mozilla Firefox or Google Chromium.</p>

<p>It contains the results of the security scan, states what changes need to be made, and how to make them.</p>

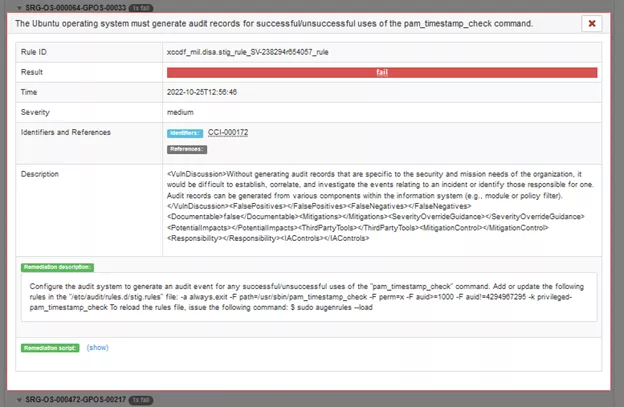
<p>Some of the fixes required cannot be done via a simple shell command but instead need to be done manually. An example is below:</p>

<p><img src="/assets/img/posts/ubuntu_oscap_1.webp" alt="ubuntu_oscap_1" /></p>

<p>The section <strong>Remediation Description</strong> explains what changes need to be made to the system to resolve the failure.</p>

<p>25. After all the changes are made manually, re-run the post report (Step 24) and verify the results.</p>

<ul>
  <li>Any future configurations of the system require that the security scan is again completed from <strong>Step 24</strong></li>
</ul>

<h3 id="locking-grub-boot-screen">Locking GRUB Boot Screen</h3>
<p>It is important to set a password for the GRUB boot screen to prevent changes to the boot environment
    - <strong>Note</strong>: The following commands must be run in a root environment due to the file redirection required.</p>

<ol>
  <li>Generate an encrypted password by running:
    <div class="language-bash highlighter-rouge"><div class="highlight"><pre class="highlight"><code> grub-mkpasswd-pbkdf2
</code></pre></div>    </div>
    <p>On the prompt enter your desired grub password</p>
  </li>
  <li>The output should look somewhat like the following:
    <div class="language-bash highlighter-rouge"><div class="highlight"><pre class="highlight"><code> Your PBKDF2 is grub.pbkdf2.sha512.10000.FC8373BCA15ATAN515ANRTT1516159AVVNTEAT41864TWATV74AFW44868WAF4884FWA4AJKY48
</code></pre></div>    </div>
  </li>
  <li>Copy the “grub.pbkdf2.sha512……” section of the output</li>
  <li>Run the following command:
    <div class="language-bash highlighter-rouge"><div class="highlight"><pre class="highlight"><code> <span class="nb">sudo </span>nano /etc/grub.d/40_custom
</code></pre></div>    </div>
  </li>
  <li>Inside the 40_custom file enter the following:
    <div class="language-bash highlighter-rouge"><div class="highlight"><pre class="highlight"><code> <span class="nb">set </span>superusers <span class="o">=</span> <span class="s2">"bootroot"</span>
 password_pbkdf2 bootroot grub.sha512.10000.........
</code></pre></div>    </div>
  </li>
  <li>Run the following to update the grub:
    <div class="language-bash highlighter-rouge"><div class="highlight"><pre class="highlight"><code> update-grubb
</code></pre></div>    </div>
  </li>
</ol>

<h3 id="congratulations">Congratulations</h3>
<p>You have completed this configuration walkthrough. Treat the result as a starting point for validation, not evidence of NIST SP 800-171 compliance.</p>]]></content><author><name>Ryan Adamczyk</name><email>me@ryanadamczyk.com</email></author><category term="Security" /><category term="Linux" /><category term="ubuntu" /><category term="nist-800-171" /><category term="security" /><category term="compliance" /><category term="hardening" /><summary type="html"><![CDATA[A detailed guide to hardening Ubuntu 22.04 LTS for NIST 800-171 compliance, including SCAP scans and DoD STIG fixes.]]></summary></entry><entry><title type="html">A glance into my HomeLab</title><link href="https://www.radamczyk.com/2025-02-25/homelab-setup" rel="alternate" type="text/html" title="A glance into my HomeLab" /><published>2025-02-25T12:00:00+00:00</published><updated>2025-02-25T12:00:00+00:00</updated><id>https://www.radamczyk.com/2025-02-25/homelab-setup</id><content type="html" xml:base="https://www.radamczyk.com/2025-02-25/homelab-setup"><![CDATA[<blockquote class="post-notice">
  <p><strong>Snapshot note:</strong> This is a February 2025 overview of a personal learning environment. Hardware, services, and goals may have changed since publication.</p>
</blockquote>

<h2 id="why-homelab">Why HomeLab?</h2>
<p>During my time at Florida Atlantic University, I had the chance to gain hands-on experience in a hypervisor environment. Although my permissions and scope were limited, I was captivated from the start. To safely explore and learn about hypervisors, virtual machines, Linux, networking, and more, I decided to set up my own HomeLab.</p>

<h3 id="hardware-and-software">Hardware and Software</h3>
<p>To start my HomeLab I picked up a 12th generation Intel NUC (NUC12WSKi7) on eBay barebones for $535. <br />
On the NUC I decided to run Proxmox VE 8.3.3.<br />
Inside the NUC I have:</p>

<div class="language-plaintext highlighter-rouge"><div class="highlight"><pre class="highlight"><code>16 Core i7-1260P CPU
64 GB RAM
2 TB SSD (Data Volume)
512 GB SSD (Proxmox)
</code></pre></div></div>

<p>I decided to pick up a Raspberry Pi 4 Model B from CanaKit for $134.<br />
On the Pi I decided to run VMWare vSphere 8.<br />
Inside the Raspberry Pi 4 is:</p>

<div class="language-plaintext highlighter-rouge"><div class="highlight"><pre class="highlight"><code>4 core ARMv8 CPU
8 GB RAM
64 GB MicroSD (vSphere)
128 GB Flash Drive (Data Volume)
</code></pre></div></div>

<h3 id="initial-goals">Initial Goals</h3>
<p>Some of my initial goals, beyond learning to navigate and manage a hypervisor environment, included:</p>

<ul>
  <li>Learning Linux</li>
  <li>Working exclusively with the CLI to become more familiar with Bash</li>
  <li>Learning Docker</li>
  <li>Learning Docker Compose and how to write .YML files</li>
  <li>Setting up home game servers for my friends and me to play on</li>
</ul>

<p>I have successfully achieved many of these goals and have now shifted my focus to learning Kubernetes and Ansible. I aim to automate my entire HomeLab with playbooks and potentially achieve high availability capabilities if I add more nodes in the future.</p>

<h3 id="virtual-machines-and-their-use-cases">Virtual Machines and their use cases</h3>
<p>After setting up my initial Proxmox node and data volumes I spun up the following containers and created the following VM’s:</p>
<ul>
  <li>pihole (LXC)</li>
  <li>homarr (LXC)</li>
  <li>nginxproxymanager (LXC)</li>
  <li>tailscale (LXC)</li>
  <li>game-server (VM)
-arr (Media Server VM)</li>
</ul>

<h4 id="pihole">PiHole</h4>
<p>The first thing I did after setting up Proxmox was create a PiHole LXC container directly within Proxmox.</p>

<p>This was important to set up first, as I planned on using PiHole as my HomeLabs DNS server to both block adds and allow for setting up a reverse proxy with NGINX.</p>

<h4 id="homarr">Homarr</h4>
<p>I went with Homarr as my dashboard of choice.</p>

<p>I found it provided the best mix of simplicity and functionality for my use case thus far. The integration with services like Proxmox is a plus.</p>

<h4 id="nginx-proxy-manager">NGINX Proxy Manager</h4>
<p>I have previously used Traefik as my reverse proxy, however I found myself recently switching to NGINX for its simplicity.</p>

<p>I spin up new services for testing quite often, and I found nginx’s web UI super useful in comparison to Traefiks configuration for my setup.</p>

<h4 id="tailscale">Tailscale</h4>
<p>I chose to run Tailscale in an LXC container. This container acts as the hub for all of my Tailscale network.</p>

<p>I have this node configured to advertise subnet and act as an exit node. This allows me to remotely utilize any of my services as long as I am connected to my Tailscale network.</p>

<h4 id="arr-media-server">arr (Media Server)</h4>
<p>For my home media server I decided to spin up a VM running docker.</p>

<p>I chose to run a custom setup of geekau’s media stack found here: https://github.com/geekau/mediastack</p>

<p>In this stack I am running the following services:</p>
<ul>
  <li>Portainer</li>
  <li>Jellyfin</li>
  <li>Jellyseerr</li>
  <li>Homarr</li>
  <li>Prowlarr</li>
  <li>Radarr</li>
  <li>Sonarr</li>
  <li>Readarr</li>
  <li>Bazarr</li>
  <li>SABnzbd</li>
  <li>qBittorrent</li>
  <li>Filebot</li>
</ul>

<h4 id="game-server">Game-Server</h4>
<p>The last VM I created was my ‘game-server’ VM, which I decided to run headless on Ubuntu 20.04 LTS.</p>

<p>My friends and I play a lot of Minecraft and wanted to stop paying for realms or dedicated servers. So, I installed Java and configured this VM to run a dedicated Minecraft server.</p>

<p>Within this VM, I wrote scripts to perform daily server restarts and backups to ensure performance and reliability.</p>

<p>After successfully setting up the server, I faced the challenge of allowing my friends outside my home network to connect to it safely. I didn’t feel comfortable port forwarding my router and am quite proud of the solution I devised.</p>

<p>Initially, I decided to use Tailscale as an easy-to-use VPN to allow my friends to connect to the server. I have installed tailscale directly onto the VM and then share the specific machine access to my friends via the Tailscale admin console.</p>

<h3 id="conclusion">Conclusion</h3>
<p>This has been a broad overview of how I’ve utilized my HomeLab for personal use and learning. I highly encourage anyone thinking about setting up a HomeLab to go for it. You can achieve almost everything I’ve done with any functional spare computer. Thank you for reading, and if you have any questions, feel free to reach out!</p>]]></content><author><name>Ryan Adamczyk</name><email>me@ryanadamczyk.com</email></author><category term="HomeLab" /><category term="Infrastructure" /><category term="proxmox" /><category term="vmware" /><category term="docker" /><category term="homelab" /><category term="self-hosting" /><summary type="html"><![CDATA[A look into my HomeLab setup running Proxmox VE, VMWare vSphere, and various Docker containers for learning and personal use.]]></summary></entry><entry><title type="html">How to use Microsoft Power Automate to create conditional Microsoft Forms</title><link href="https://www.radamczyk.com/2024-09-12/powerautomate-microsoft-form" rel="alternate" type="text/html" title="How to use Microsoft Power Automate to create conditional Microsoft Forms" /><published>2024-09-12T12:00:00+00:00</published><updated>2024-09-12T12:00:00+00:00</updated><id>https://www.radamczyk.com/2024-09-12/powerautomate-microsoft-form</id><content type="html" xml:base="https://www.radamczyk.com/2024-09-12/powerautomate-microsoft-form"><![CDATA[<h2 id="power-automate--microsoft-forms">Power Automate &amp; Microsoft Forms</h2>
<p>Power Automate can be a very powerful tool when the situation is appropriate.</p>

<p>I recently found myself needing to create a Microsoft form that collects as follows:</p>
<ul>
  <li>Ask for users Full Name</li>
  <li>Prompt user to select one time slot out of 8 provided options</li>
</ul>

<p>The catch in my scenario however, is that for 4 of the time slots I wanted to ensure only 7 people could sign up. In the other 4 time slots I wanted to ensure only 14 people could sign up.</p>

<p>You would assume this might already be a feature in Microsoft Forms, however you would be sadly mistaken. I discovered that the only way to achieve this is by utilizing Power Automate.</p>

<h3 id="goal-of-the-power-automate-flow">Goal of the Power Automate Flow</h3>
<p>Once I discovered I would have to be using Power Automate I decided I wanted to learn as much as possible and add lots of functionality to the form.<br />
Therefore my goals for the flow were as follows:</p>
<ul>
  <li>Gather the users email and full name</li>
  <li>Gather the users preferred time slot</li>
  <li>Ensure that all time slots would not exceed the maximum capacity</li>
  <li>Send a meeting invite to the user for their desired time as confirmation</li>
  <li>Send an email to the user if their desired time was full</li>
</ul>

<h3 id="beginning-requirements">Beginning Requirements</h3>
<p>In order for this flow to function properly you will first need to set up a couple things.</p>

<p>First you must create the desired Microsoft Form, for my case I created a form and added a question for Full Name and a question asking to select one of 8 time slots.</p>

<p>Next you must create a list inside SharePoint, this will act as the storing grounds for your forms data instead of the forms ‘Responses’ section.<br />
This list is necessary in order for the flow to properly evaluate whether a time slot is at capacity or not.<br />
This list must contain matching columns to the form, so columns should look as following:</p>
<ul>
  <li>Full Name</li>
  <li>Time Slot
    <ul>
      <li>Ensure that you added matching time slot sections within this column</li>
    </ul>
  </li>
  <li>Response Count</li>
</ul>

<h3 id="flow-structure">Flow Structure</h3>
<p>Now by no means is this flow likely the most efficient way to do this task, however this was how I got it to work for my functionality. In the future I will look to discover ways to optimize my flow for efficiency.</p>

<p>With that being said, here is the flows structures as well as details for each flow action:</p>
<ol>
  <li>When a new response is submitted
    <ul>
      <li>This is the first action in the flow and is what prompts the flow to start</li>
      <li>Link this action to your desired Microsoft Form</li>
    </ul>
  </li>
  <li>Get response details
    <ul>
      <li>This action retrieves all the submitted data from the form and brings it into the flow</li>
    </ul>
  </li>
  <li>Initialize Variable
    <ul>
      <li>Name: TimeSlotCount</li>
      <li>Type: Integer</li>
      <li>Value: 0</li>
    </ul>
  </li>
  <li>Initialize Variable 1
    <ul>
      <li>Name: SelectedTimeSlot</li>
      <li>Type: String</li>
      <li>Value: Use the dynamic content from the Microsoft form: ‘Time Slot’</li>
    </ul>
  </li>
  <li>Initialize Variable 2
    <ul>
      <li>Name: MaxCount</li>
      <li>Type: Integer</li>
      <li>Value: 0</li>
    </ul>
  </li>
  <li>Initialize Variable 3
    <ul>
      <li>Name: StartTime</li>
      <li>Type: String</li>
      <li>Value: Blank</li>
    </ul>
  </li>
  <li>Initialize Variable 4
    <ul>
      <li>Name: EndTime</li>
      <li>Type: String</li>
      <li>Value: Blank</li>
    </ul>
  </li>
  <li>Compose SelectedTimeSlot
    <ul>
      <li>Inputs: SelectedTimeSlot Variable</li>
    </ul>
  </li>
  <li>Compose SplitTimeSlot
    <ul>
      <li>Inputs: split(variables(‘SelectedTimeSlot’), ‘ - ‘)</li>
      <li>This compose action breaks apart the SelectedTimeSlot data for reformatting</li>
    </ul>
  </li>
  <li>Compose StartTime
    <ul>
      <li>Inputs: first(outputs(‘SplitTimeSlot’))</li>
      <li>This compose action takes the start time of the provided split time slot</li>
    </ul>
  </li>
  <li>Compose EndTime
    <ul>
      <li>Inputs: last(outputs(‘SplitTimeSlot’))</li>
      <li>This compose action takes the end time of the provided split time slot</li>
    </ul>
  </li>
  <li>Compose Formatted StartTime
    <ul>
      <li>Inputs: concat(‘2024-09-19T’, formatDateTime(outputs(‘Compose_StartTime’), ‘HH:mm:ss’))</li>
      <li>This compose action formats the StartTime variable to be useable in creating a meeting invite properly</li>
    </ul>
  </li>
  <li>Compose Formatted EndTime
    <ul>
      <li>Inputs: concat(‘2024-09-19T’, formatDateTime(outputs(‘Compose_EndTime’), ‘HH:mm:ss’))</li>
      <li>This compose action formats the EndTime variable to be usable in creating a meeting invite properly</li>
    </ul>
  </li>
  <li>Set StartTime
    <ul>
      <li>Name: StartTime</li>
      <li>Value: Use the dynamic output of the Formatted StartTime compose action</li>
    </ul>
  </li>
  <li>Set EndTime
    <ul>
      <li>Name: EndTime</li>
      <li>Value: Use the dynamic output of the Formatted EndTime compose action</li>
    </ul>
  </li>
  <li>Condition 1
    <ul>
      <li>OR:
        <ul>
          <li>Variable SelectedTimeSlot is equal to ‘00:00 AM - 00:00 AM’</li>
          <li>Variable SelectedTimeSlot is equal to ‘00:00 AM - 00:00 AM’</li>
          <li>Variable SelectedTimeSlot is equal to ‘00:00 AM - 00:00 AM’</li>
          <li>Variable SelectedTimeSlot is equal to ‘00:00 AM - 00:00 AM’</li>
        </ul>
      </li>
      <li>For True add:
        <ul>
          <li>Set Variable
            <ul>
              <li>Name: MaxCount</li>
              <li>Value: 14</li>
            </ul>
          </li>
        </ul>
      </li>
      <li>For False add:
        <ul>
          <li>Set Variable
            <ul>
              <li>Name: MaxCount</li>
              <li>Value: 7</li>
            </ul>
          </li>
        </ul>
      </li>
      <li>This condition evaluates whether the selected time slot should have a 7 or 14 person capacity</li>
    </ul>
  </li>
  <li>Get Items
    <ul>
      <li>Site Address: Use the link to your personal SharePoint</li>
      <li>List Name: Select the list you created earlier in SharePoint</li>
      <li>Top Count: 300
        <ul>
          <li>This is set to optimize the flow</li>
        </ul>
      </li>
    </ul>
  </li>
  <li>Apply to each
    <ul>
      <li>Select An Output From Previous Steps: Select the dynamic content ‘body/value’ from the SharePoint</li>
      <li>Inside the Apply to Each loop add the following:
        <ul>
          <li>Compose
            <ul>
              <li>Inputs: Select the dynamic content ‘TimeSlot.Value’ from the SharePoint</li>
            </ul>
          </li>
          <li>Compose 1
            <ul>
              <li>Inputs: SelectedTimeSlot Variable</li>
            </ul>
          </li>
          <li>Condition
            <ul>
              <li>AND:
                <ul>
                  <li>Compose is equal to Compose 1</li>
                </ul>
              </li>
              <li>For True add:
                <ul>
                  <li>Increment Variable
                    <ul>
                      <li>Name: TimeSlotCount</li>
                      <li>Value: 1</li>
                    </ul>
                  </li>
                </ul>
              </li>
              <li>For False add nothing</li>
            </ul>
          </li>
        </ul>
      </li>
    </ul>
  </li>
  <li>Condition 1
    <ul>
      <li>AND:
        <ul>
          <li>TimeSlotCount is less then MaxCount</li>
        </ul>
      </li>
      <li>For True add:
        <ul>
          <li>Get Items 1
            <ul>
              <li>Site Address: Use the link to your personal SharePoint</li>
              <li>List Name: Select the list you created earlier in SharePoint</li>
              <li>Filter Query: TimeSlot eq ‘SelectedTimeSlot’</li>
            </ul>
          </li>
          <li>Apply to Each 1
            <ul>
              <li>Select An Output From Previous Steps: Select the dynamic content ‘body/value’ from the SharePoint</li>
              <li>Update Item
                <ul>
                  <li>Site Address: Use the link to your personal SharePoint</li>
                  <li>List Name: Select the list you created earlier in SharePoint</li>
                  <li>ID: Select the dynamic content ‘ID’ from the SharePoint</li>
                  <li>Response Count: add(items(‘Apply_to_Each1’)?[‘ResponseCount’], 1)</li>
                </ul>
              </li>
            </ul>
          </li>
          <li>Create Item
            <ul>
              <li>Site Address: Use the link to your personal SharePoint</li>
              <li>List Name: Select the list you created earlier in SharePoint</li>
              <li>Title: Use the dynamic content ‘Full Name’ from the Microsoft Form</li>
              <li>Time Slot Value: Use the SelectedTimeSlot variable</li>
              <li>Response Count: add(variables(‘TimeSlotCount’),1)</li>
            </ul>
          </li>
          <li>Create Event (V4)
            <ul>
              <li>Calendar ID: Calendar</li>
              <li>Subject: <strong>__</strong> Confirmation</li>
              <li>Start Time: Use the StartTime variable</li>
              <li>End Time: Use the EndTime variable</li>
              <li>Time Zone: Use your local time zone</li>
              <li>Required Attendees: Use the dynamic content ‘Responder’s Email’ from the form</li>
              <li>Body: Write your desired event message</li>
              <li>Location: Add your desired location</li>
              <li>Show As: busy</li>
            </ul>
          </li>
        </ul>
      </li>
      <li>For False add:
        <ul>
          <li>Send me an email notification
            <ul>
              <li>Subject: _____ Time Slot Full</li>
              <li>Body: Sadly the time slot you selected ‘SelectedTimeSlot’ is already full, please select a different time slot</li>
            </ul>
          </li>
        </ul>
      </li>
    </ul>
  </li>
</ol>

<h3 id="flow-completion">Flow Completion</h3>
<p>You should now have a functional flow that triggers upon form submission, verifies the response against SharePoint list data, inserts the data into the SharePoint list, and sends a confirmation to the user.</p>

<p>Here is a rough screenshot of what the ending flow should look like:</p>

<p><img src="/assets/img/posts/pa_flow.webp" alt="pa_flow" /></p>

<h3 id="closing-remarks">Closing Remarks</h3>
<p>This is just one example of how you can utilize Power Automate with Microsoft Forms.</p>

<p>If you’re not collecting time slot data from users, you can adjust the variables accordingly, but the core logic and flow will remain consistent.</p>]]></content><author><name>Ryan Adamczyk</name><email>me@ryanadamczyk.com</email></author><category term="Automation" /><category term="Microsoft" /><category term="power-automate" /><category term="microsoft-forms" /><category term="sharepoint" /><category term="automation" /><summary type="html"><![CDATA[Learn how to use Power Automate to create conditional Microsoft Forms with limited slot capacities.]]></summary></entry><entry><title type="html">Ubuntu 20.04 LTS NIST 800-171 Configuration</title><link href="https://www.radamczyk.com/2023-10-27/Ubuntu-20-04-LTS-NIST-800-171-Configuration" rel="alternate" type="text/html" title="Ubuntu 20.04 LTS NIST 800-171 Configuration" /><published>2023-10-27T15:40:00+00:00</published><updated>2023-10-27T15:40:00+00:00</updated><id>https://www.radamczyk.com/2023-10-27/Ubuntu-20-04-LTS-NIST-800-171-Configuration</id><content type="html" xml:base="https://www.radamczyk.com/2023-10-27/Ubuntu-20-04-LTS-NIST-800-171-Configuration"><![CDATA[<blockquote class="post-notice">
  <p><strong>Historical project note:</strong> This walkthrough documents a past, FAU-assigned configuration project. Ubuntu 20.04 reached end of standard support in May 2025; use a currently supported release (or Ubuntu Pro/ESM where appropriate) and validate requirements before following this guide. It is not a claim of organizational compliance.</p>
</blockquote>

<h2 id="nist-800-171">NIST 800-171</h2>
<p>NIST Special Publication 800-171, titled “Protecting Controlled Unclassified Information in Non-Federal Systems and Organizations,” is a document published by the National Institute of Standards and Technology (NIST), aimed at standardizing the way non-federal entities protect sensitive but unclassified information.</p>

<p>The publication outlines 14 families of security requirements that aim to secure Controlled Unclassified Information (CUI) when it is stored, processed, or transmitted by non-federal systems and organizations.</p>

<h3 id="14-families-of-security-requirements">14 Families of Security Requirements</h3>
<ul>
  <li>Access Control
    <ul>
      <li>Restricting access to CUI through the enforcement of access permissions.</li>
    </ul>
  </li>
  <li>Awareness and Training
    <ul>
      <li>Ensuring that organizational personnel are adequately trained and aware of security risks.</li>
    </ul>
  </li>
  <li>Audit and Accountability
    <ul>
      <li>Creating and retaining system audit logs and records to the extent needed to enable the monitoring, analysis, investigation, and reporting of unlawful or unauthorized system activity.</li>
    </ul>
  </li>
  <li>Configuration Management
    <ul>
      <li>Establishing and maintaining the integrity of organizational systems by applying security configurations and monitoring changes.</li>
    </ul>
  </li>
  <li>Identification and Authentication
    <ul>
      <li>Ensuring the identity of users and processes that access organizational systems.</li>
    </ul>
  </li>
  <li>Incident Response
    <ul>
      <li>Establishing an operational incident handling capability for organizational systems.</li>
    </ul>
  </li>
  <li>Maintenance
    <ul>
      <li>Performing timely maintenance of organizational systems.</li>
    </ul>
  </li>
  <li>Media Protection
    <ul>
      <li>Protecting system media containing CUI, both paper and digital.</li>
    </ul>
  </li>
  <li>Physical Protection
    <ul>
      <li>Limiting physical access to organizational systems and the facilities in which they are housed.</li>
    </ul>
  </li>
  <li>Personnel Security
    <ul>
      <li>Ensuring that individuals occupying positions of responsibility within organizations are trustworthy and meet established security criteria.</li>
    </ul>
  </li>
  <li>Risk Assessment
    <ul>
      <li>Conducting assessments of risks to organizational operations, assets, and individuals.</li>
    </ul>
  </li>
  <li>Security Assessment
    <ul>
      <li>Assessing the security controls in organizational systems to determine their effectiveness.</li>
    </ul>
  </li>
  <li>System and Communications Protection
    <ul>
      <li>Monitoring, controlling, and protecting organizational communications at the external boundaries and key internal boundaries of information systems.</li>
    </ul>
  </li>
  <li>System and Information Integrity
    <ul>
      <li>Identifying, reporting, and correcting information and information system flaws in a timely manner.</li>
    </ul>
  </li>
</ul>

<h3 id="overview-of-the-build-steps">Overview of the Build Steps</h3>
<ol>
  <li>Install fresh Ubuntu 20.04 LTS system</li>
  <li>Preconfigure the system for compliance</li>
  <li>Run SCAP agent against OS</li>
  <li>Collect results to compare and define steps needed for compliance</li>
  <li>Run SCAP for verification</li>
  <li>Fix the non-compliant issues</li>
  <li>Repeat steps 3 through 6 as needed</li>
</ol>

<h3 id="fresh-ubuntu-2004-lts-installation">Fresh Ubuntu 20.04 LTS Installation</h3>
<p>1. Install Ubuntu 20.04 via DVD, ISO, or USB</p>

<p><img src="/assets/img/posts/ubuntu_install_1.webp" alt="ubuntu_install_1" /></p>

<p><img src="/assets/img/posts/ubuntu_install_2.webp" alt="ubuntu_install_2" /></p>

<p>2. If an internet connection is available, choose <strong>Download updates while installing Ubuntu</strong>. Also choose <strong>Install third-party software for graphics…</strong> if specialized drivers are needed for hardware.</p>

<p><img src="/assets/img/posts/ubuntu_install_3.webp" alt="ubuntu_install_3" /></p>

<p>3. If there is only one drive in the system, use the default setting to configure the drive and choose <strong>Advanced Features</strong> to enable LVM with encryption. Otherwise, configure the partitions and encrypted volumes under <strong>Something Else</strong>.</p>

<p><img src="/assets/img/posts/ubuntu_install_4.webp" alt="ubuntu_install_4" /></p>

<p>4. In the LVM/Encryption screen, enter a very long complex password that will be used to encrypt the drive. The password should be at least 16 characters long. Store the password in a secured place.
    - <strong>Note</strong>: Once TPM boot is configured, the encryption password will only be used for emergency recovery.</p>

<p><img src="/assets/img/posts/ubuntu_install_5.webp" alt="ubuntu_install_5" /></p>

<p>5. Choose <strong>Install Now</strong> once storage is configured. Next, choose <strong>Continue</strong> to write changes to disks.<img src="/assets/img/posts/ubuntu_install_6.webp" alt="ubuntu_install_6" /></p>

<p>6. Choose the correct time zone for the system.</p>

<p><img src="/assets/img/posts/ubuntu_install_7.webp" alt="ubuntu_install_7" /></p>

<p>7. The account created at this step will be used as the <strong>Local Admin</strong> account for the system. The computer name is also entered here, following the standards required for the group.</p>

<p><img src="/assets/img/posts/ubuntu_install_8.webp" alt="ubuntu_install_8" /></p>

<p>8. The system wil begin the install. Once completed, allow it to reboot.</p>

<p><img src="/assets/img/posts/ubuntu_install_9.webp" alt="ubuntu_install_9" /></p>

<p>9. Do not upgrade or update the system at this point. Upgrading will change the system to version 22.04, which is not supported. The <strong>Software Updater</strong> will not add the necessary features needed. Choose <strong>Remind Me Later</strong> and <strong>Don’t Upgrade</strong>.</p>

<p><img src="/assets/img/posts/ubuntu_install_10.webp" alt="ubuntu_install_10" /></p>

<p>10. Press <strong>Skip</strong> to continue the installation process.</p>

<p><img src="/assets/img/posts/ubuntu_install_11.webp" alt="ubuntu_install_11" /></p>

<p>11. Click <strong>Next</strong> to skip the Livepath option, if the system does not have a Canonical license.</p>

<p><img src="/assets/img/posts/ubuntu_install_12.webp" alt="ubuntu_install_12" /></p>

<p>12. Click <strong>No</strong> and then <strong>Next</strong> to avoid sending information to Canonical. Click <strong>Next</strong> and leave location servic disabled. Next, click <strong>Done</strong>.</p>

<p><img src="/assets/img/posts/ubuntu_install_13.webp" alt="ubuntu_install_13" /></p>

<h3 id="prep-system-for-hardening">Prep System for Hardening</h3>
<p>13. Click the <strong>Show Applications</strong> button on the lower left and type in <strong>Terminal</strong> to start the application.</p>

<p><img src="/assets/img/posts/ubuntu_hardening_1.webp" alt="ubuntu_hardening_1" /></p>

<p>14. Update the system files and upgrade any files.
    - <strong>Note</strong>: Most of the following commands will require <strong>SUDO</strong> mode</p>
<div class="language-bash highlighter-rouge"><div class="highlight"><pre class="highlight"><code><span class="nb">sudo </span>apt update
<span class="nb">sudo </span>apt upgrade
</code></pre></div></div>

<p><img src="/assets/img/posts/ubuntu_hardening_2.webp" alt="ubuntu_hardening_2" /></p>

<p>15. Install the following packages needed for hardening, then remove old packages.</p>

<ul>
  <li><strong>Note</strong>: For postfix options, choose the option <strong>Local Installation</strong> and name the current computer name the same as the DNS name.</li>
</ul>

<div class="language-bash highlighter-rouge"><div class="highlight"><pre class="highlight"><code><span class="nb">sudo </span>apt <span class="nb">install </span>libopenscap8 vlock libpam-pkcs11 libpam-pwquality opensc-pkcs11 chrony clamav unattended-upgrades auditd aide
<span class="nb">sudo </span>apt autoremove
</code></pre></div></div>
<p>16. Install OpenSSH server if remote access to the system is required.</p>
<ul>
  <li><strong>Note</strong>: This step must be done before the hardening script below in order to make sure that hardening steps are applied.
    <div class="language-bash highlighter-rouge"><div class="highlight"><pre class="highlight"><code><span class="nb">sudo </span>apt <span class="nb">install </span>openssh-server
</code></pre></div>    </div>
  </li>
</ul>

<p>17. Set the login notification messages for local and remote logins.</p>
<div class="language-bash highlighter-rouge"><div class="highlight"><pre class="highlight"><code><span class="nb">echo</span> <span class="s1">'You are accessing a system that is provided for authorized use only. By using this system, you consent to the acceptable use policy.'</span> <span class="o">&gt;&gt;</span> /etc/issue
<span class="nb">echo</span> <span class="s1">'You are accessing a system that is provided for authorized use only. By using this system, you consent to the acceptable use policy.'</span> <span class="o">&gt;</span> /etc/issue.net
</code></pre></div></div>

<p>18. Set the timeout, login notification messages, and USB mount handling for the GUI session</p>
<ul>
  <li><strong>Note</strong>: this is specifically for the GDM session manager. Research will be needed to change the setting for KDE or other managers. They are not needed if the system does not have a GUI. These commands must be run in a terminal session of the GUI to work properly.
    <div class="language-bash highlighter-rouge"><div class="highlight"><pre class="highlight"><code><span class="nb">sudo</span> <span class="nt">-i</span>
xhost +SI:localuser:gdm
<span class="nb">sudo</span> <span class="nt">-u</span> gdm gsettings <span class="nb">set </span>org.gnome.login-screen disable-user-list <span class="nb">true
sudo</span> <span class="nt">-u</span> gdm gsettings <span class="nb">set </span>org.gnome.login-screen banner-message-enable <span class="nb">true
sudo</span> <span class="nt">-u</span> gdm gsettings <span class="nb">set </span>org.gnome.login-screen banner-message-text <span class="s1">'You are accessing a system that is provided for authorized use only. By using this system, you consent to the acceptable use policy.'</span>
<span class="nb">sudo</span> <span class="nt">-u</span> gdm gsettings <span class="nb">set </span>org.gnome.desktop.media-handling automount <span class="nb">false
exit</span>
</code></pre></div>    </div>
  </li>
</ul>

<h3 id="dod-stig-based-fixes">DoD STIG Based Fixes</h3>
<ul>
  <li>Fixes from v18.04
    <ul>
      <li>rule_sysctl_fs_suid_dumpable</li>
      <li>rule_sysctl_kernel_randomize_va_space</li>
    </ul>
  </li>
  <li>DoD STIGs</li>
  <li>xccdf_mil.disa.stig_rule_SV-238202r653781_rule
    <ul>
      <li>Set password rules</li>
    </ul>
  </li>
  <li>xccdf_mil.disa.stig_rule_SV-238209r653802_rule
    <ul>
      <li>Change permissions on rule file</li>
    </ul>
  </li>
  <li>xccdf_mil.disa.stig_rule_SV-238210r653805_rule</li>
  <li>xccdf_mil.disa.stig_rule_SV-238210r653805_rule (SSH)</li>
  <li>xccdf_mil.disa.stig_rule_SV-238212r653811_rule</li>
  <li>xccdf_mil.disa.stig_rule_SV-238213r653814_rule</li>
  <li>xccdf_mil.disa.stig_rule_SV-238216r654316_rule</li>
  <li>xccdf_mil.disa.stig_rule_SV-238217r832940_rule</li>
  <li>xccdf_mil.disa.stig_rule_SV-238218r653829_rule</li>
  <li>xccdf_mil.disa.stig_rule_SV-238219r653832_rule</li>
  <li>xccdf_mil.disa.stig_rule_SV-238220r653835_rule</li>
  <li>xccdf_mil.disa.stig_rule_SV-238221r653838_rule</li>
  <li>xccdf_mil.disa.stig_rule_SV-238222r653841_rule</li>
  <li>xccdf_mil.disa.stig_rule_SV-238223r653844_rule</li>
  <li>xccdf_mil.disa.stig_rule_SV-238226r653853_rule</li>
  <li>xccdf_mil.disa.stig_rule_SV-238225r832942_rule</li>
  <li>xccdf_mil.disa.stig_rule_SV-238227r653856_rule</li>
  <li>xccdf_mil.disa.stig_rule_SV-238228r653859_rule</li>
  <li>xccdf_mil.disa.stig_rule_SV-238237r653886_rule</li>
  <li>xccdf_mil.disa.stig_rule_SV-238357r654246_rule</li>
  <li>xccdf_mil.disa.stig_rule_SV-238201r832933_rule</li>
  <li>xccdf_mil.disa.stig_rule_SV-238249r653922_rule</li>
  <li>xccdf_mil.disa.stig_rule_SV-238250r653925_rule</li>
  <li>xccdf_mil.disa.stig_rule_SV-238251r653928_rule</li>
  <li>xccdf_mil.disa.stig_rule_SV-238330r654165_rule
    <ul>
      <li>Disable accounts after 60 days</li>
    </ul>
  </li>
  <li>xccdf_mil.disa.stig_rule_SV-238337r654186_rule</li>
  <li>xccdf_mil.disa.stig_rule_SV-238340r654195_rule
    <ul>
      <li>Harden log files</li>
    </ul>
  </li>
</ul>

<p><strong>Note</strong>:</p>
<ul>
  <li>“xccdf_mil.disa.stig_rule_SV-238363r654320_rule” cannot be configured without a Ubuntu subscription. However, this documentation activates and forces FIPS level encryption</li>
  <li>“xccdf_mil.disa.stig_rule_SV-238330r654165_rule” is configured by the script to 60 days as opposed to the DOD documentation of 180</li>
</ul>

<p>19. Run the following fixes <strong>as root</strong> to manually resolve STIG rules based on the rules listed above</p>
<div class="language-bash highlighter-rouge"><div class="highlight"><pre class="highlight"><code><span class="nb">sudo </span>bash
<span class="nb">sudo echo</span> <span class="s1">'fs.suid_dumpable = 0'</span> <span class="o">&gt;&gt;</span> /etc/sysctl.d/10-kernel-hardening.conf
<span class="nb">sudo echo</span> <span class="s1">'kernel.randomize_va_space = 2'</span> <span class="o">&gt;&gt;</span> /etc/sysctl.d/10-kernel-hardening.conf
<span class="nb">sudo sed</span> <span class="nt">-i</span> <span class="s1">'s/PASS_MIN_DAYS.*0/PASS_MIN_DAYS 1/g'</span> /etc/login.defs
<span class="nb">sudo sed</span> <span class="nt">-i</span> <span class="s1">'s/PASS_MAX_DAYS.*99999/PASS_MAX_DAYS 60/g'</span> /etc/login.defs
<span class="nb">sudo sed</span> <span class="nt">-i</span> <span class="s1">'s/UMASK.*022/UMASK 077/g'</span> /etc/login.defs
<span class="nb">sudo sed</span> <span class="nt">-i</span> <span class="s1">'s/end of pam-auth-update config/\nFIX xccdf_mil\.disa\.stig_rule_SV-238210r653805/g'</span> /etc/pam.d/common-auth
<span class="nb">sudo echo</span> <span class="s1">'auth [success=2 default=ignore] pam_pkcs11.so'</span> <span class="o">&gt;&gt;</span>  /etc/pam.d/common-auth
<span class="nb">sudo echo</span> <span class="s1">'end of pam-auth-update config'</span> <span class="o">&gt;&gt;</span>  /etc/pam.d/common-auth
<span class="nb">sudo echo</span> <span class="s1">'PubkeyAuthentication yes'</span> <span class="o">&gt;&gt;</span> /etc/ssh/sshd_config
<span class="nb">sudo echo</span> <span class="s1">'Ciphers aes256-ctr,aes192-ctr,aes128-ctr'</span> <span class="o">&gt;&gt;</span> /etc/ssh/sshd_config
<span class="nb">sudo echo</span>  <span class="s1">'MACs hmac-sha2-512,hmac-sha2-256'</span> <span class="o">&gt;&gt;</span> /etc/ssh/sshd_config
<span class="nb">sudo echo</span> <span class="s1">'ClientAliveCountMax 1'</span> <span class="o">&gt;&gt;</span> /etc/ssh/sshd_config
<span class="nb">sudo echo</span> <span class="s1">'ClientAliveInterval 600'</span> <span class="o">&gt;&gt;</span> /etc/ssh/sshd_config
<span class="nb">sudo echo</span> <span class="s1">'PermitEmptyPasswords no'</span> <span class="o">&gt;&gt;</span> /etc/ssh/sshd_config
<span class="nb">sudo echo</span> <span class="s1">'PermitUserEnvironment no'</span> <span class="o">&gt;&gt;</span> /etc/ssh/sshd_config
<span class="nb">sudo sed</span> <span class="nt">-i</span> <span class="s1">'s/X11Forwarding\ yes/X11Forwarding\ no/g'</span> etc/ssh/sshd_config
<span class="nb">sudo echo</span> <span class="s1">'X11UseLocalhost yes'</span> <span class="o">&gt;&gt;</span> /etc/ssh/sshd_config
<span class="nb">sudo echo</span> <span class="s1">'ucredit=-1'</span> <span class="o">&gt;&gt;</span> /etc/security/pwquality.conf
<span class="nb">sudo echo</span> <span class="s1">'lcredit=-1'</span> <span class="o">&gt;&gt;</span> /etc/security/pwquality.conf
<span class="nb">sudo echo</span> <span class="s1">'dcredit=-1'</span> <span class="o">&gt;&gt;</span> /etc/security/pwquality.conf
<span class="nb">sudo echo</span> <span class="s1">'ocredit=-1'</span> <span class="o">&gt;&gt;</span> /etc/security/pwquality.conf
<span class="nb">sudo echo</span> <span class="s1">'difok=8'</span> <span class="o">&gt;&gt;</span> /etc/security/pwquality.conf
<span class="nb">sudo echo</span> <span class="s1">'minlen=15'</span> <span class="o">&gt;&gt;</span> /etc/security/pwquality.conf
<span class="nb">sudo echo</span> <span class="s1">'dictcheck=1'</span> <span class="o">&gt;&gt;</span> /etc/security/pwquality.conf
<span class="nb">sudo echo</span> <span class="s1">'enforcing=1'</span> <span class="o">&gt;&gt;</span> /etc/security/pwquality.conf
<span class="nb">sudo echo</span> <span class="s1">'auth required pam_faildelay.so delay=4000000'</span> <span class="o">&gt;&gt;</span> /etc/pam.d/common-auth
<span class="nb">sudo     sudo sed</span> <span class="nt">-i</span> <span class="s1">'s/makestep\ 1\ 3/makestep\ 1\ -1/g'</span> /etc/chrony/chrony.conf
<span class="nb">sudo cp</span> /usr/share/doc/libpam-pkcs11/examples/pam_pkcs11.conf.example /etc/pam_pkcs11/pam_pkcs11.conf
<span class="nb">sudo chmod</span> <span class="nt">-R</span> 0640 /etc/audit/audit<span class="k">*</span>.<span class="o">{</span>rules,conf<span class="o">}</span> /etc/audit/rules.d/<span class="k">*</span>
<span class="nb">sudo chown </span>root /etc/audit/audit<span class="k">*</span>.<span class="o">{</span>rules,conf<span class="o">}</span> /etc/audit/rules.d/<span class="k">*</span>
<span class="nb">sudo </span>useradd <span class="nt">-D</span> <span class="nt">-f</span> 60
<span class="nb">sudo </span>find /var/log <span class="nt">-perm</span> /137 <span class="nt">-type</span> f <span class="nt">-exec</span> <span class="nb">chmod </span>640 <span class="s1">'{}'</span> <span class="se">\;</span>
<span class="nb">sudo chmod </span>0750 /var/log
</code></pre></div></div>

<h3 id="openscap-configuration-and-fix">OpenSCAP Configuration and Fix</h3>
<p>20. Create a folder to hold the guides and configuration scripts. Then, download the Ubuntu SCAP guide from the DoD website. Unzip the downloaded file.</p>
<div class="language-bash highlighter-rouge"><div class="highlight"><pre class="highlight"><code><span class="nb">mkdir </span>openscap
<span class="nb">cd </span>openscap
wget https://dl.dod.cyber.mil/wp-content/uploads/stigs/zip/U_CAN_Ubuntu_20-04_LTS_V1R8_STIG_SCAP_1-2_Benchmark.zip
unzip U_CAN_Ubuntu_20-04_LTS_V1R8_STIG_SCAP_1-2_Benchmark.zip
</code></pre></div></div>
<p>21. Create a preliminary report and result file using the DoD STIG profile.</p>
<ul>
  <li><strong>Note</strong>: XXXXXX is to be replaced by today’s date in the YYMMDD format; ex 221019
    <div class="language-bash highlighter-rouge"><div class="highlight"><pre class="highlight"><code>oscap xccdf <span class="nb">eval</span> <span class="se">\</span>
<span class="nt">--profile</span> xccdf_mil.disa.stig_profile_MAC-2_Sensitive <span class="se">\</span>
<span class="nt">--fetch-remote-resources</span> <span class="se">\</span>
<span class="nt">--results</span> openscap_NIST800171_results-install.xml <span class="se">\</span>
<span class="nt">--report</span> openscap_NIST800171_report_XXXXXX-pre.html <span class="se">\</span>
U_CAN_Ubuntu_20-04_LTS_V1R8_STIG_SCAP_1-2_Benchmark.xml
</code></pre></div>    </div>
  </li>
</ul>

<p>22. Generate a fix file using the previously generated results file.</p>
<div class="language-bash highlighter-rouge"><div class="highlight"><pre class="highlight"><code><span class="nb">sudo </span>oscap xccdf generate fix <span class="se">\</span>
<span class="nt">--fix-type</span> bash <span class="nt">--result-id</span> xccdf_mil.disa.stig_profile_MAC-2_Sensitive <span class="se">\</span>
U_CAN_Ubuntu_20-04_LTS_V1R8_STIG_SCAP_1-2_Benchmark <span class="se">\</span>
<span class="o">&gt;</span> openscap_NIST800171-fix.sh
</code></pre></div></div>

<p>23. Run the generated fix file in a roow environment.</p>
<div class="language-bash highlighter-rouge"><div class="highlight"><pre class="highlight"><code><span class="nb">sudo </span>bash
sh ./openscap_NIST800171-fix.sh
<span class="nb">exit</span>
</code></pre></div></div>

<p>24. Generate a “post fix” report to find what fixes require manual modifications</p>
<ul>
  <li><strong>Note</strong>: XXXXXX is to be replaced by today’s date in the YYMMDD format; ex 221019
    <div class="language-bash highlighter-rouge"><div class="highlight"><pre class="highlight"><code>oscap xccdf <span class="nb">eval</span> <span class="se">\</span>
<span class="nt">--profile</span> xccdf_mil.disa.stig_profile_MAC-2_Sensitive <span class="se">\</span>
<span class="nt">--fetch-remote-resources</span> <span class="se">\</span>
<span class="nt">--report</span> openscap_NIST800171_report_XXXXXX-post.html <span class="se">\</span>
U_CAN_Ubuntu_20-04_LTS_V1R8_STIG_SCAP_1-2_Benchmark.xml
</code></pre></div>    </div>
  </li>
</ul>

<h3 id="manual-fixes">Manual Fixes</h3>
<p>The “openscap_NIST800171_report_XXXXXX-post.html” file that is generated is a HTML file that can be viewed in Mozilla Firefox or Google Chromium.</p>

<p>It contains the results of the security scan, states what changes need to be made, and how to make them.</p>

<p>Some of the fixes required cannot be done via a simple shell command but instead need to be done manually. An example is below:</p>

<p><img src="/assets/img/posts/ubuntu_oscap_1.webp" alt="ubuntu_oscap_1" /></p>

<p>The section <strong>Remediation Description</strong> explains what changes need to be made to the system to resolve the failure.</p>

<p>25. After all the changes are made manually, re-run the post report (Step 24) and verify the results.</p>

<ul>
  <li>Any future configurations of the system require that the security scan is again completed from <strong>Step 24</strong></li>
</ul>

<h3 id="locking-grub-boot-screen">Locking GRUB Boot Screen</h3>
<p>It is important to set a password for the GRUB boot screen to prevent changes to the boot environment
    - <strong>Note</strong>: The following commands must be run in a root environment due to the file redirection required.</p>

<ol>
  <li>Generate an encrypted password by running:
    <div class="language-bash highlighter-rouge"><div class="highlight"><pre class="highlight"><code> grub-mkpasswd-pbkdf2
</code></pre></div>    </div>
    <p>On the prompt enter your desired grub password</p>
  </li>
  <li>The output should look somewhat like the following:
    <div class="language-bash highlighter-rouge"><div class="highlight"><pre class="highlight"><code> Your PBKDF2 is grub.pbkdf2.sha512.10000.FC8373BCA15ATAN515ANRTT1516159AVVNTEAT41864TWATV74AFW44868WAF4884FWA4AJKY48
</code></pre></div>    </div>
  </li>
  <li>Copy the “grub.pbkdf2.sha512……” section of the output</li>
  <li>Run the following command:
    <div class="language-bash highlighter-rouge"><div class="highlight"><pre class="highlight"><code> <span class="nb">sudo </span>nano /etc/grub.d/40_custom
</code></pre></div>    </div>
  </li>
  <li>Inside the 40_custom file enter the following:
    <div class="language-bash highlighter-rouge"><div class="highlight"><pre class="highlight"><code> <span class="nb">set </span>superusers <span class="o">=</span> <span class="s2">"bootroot"</span>
 password_pbkdf2 bootroot grub.sha512.10000.........
</code></pre></div>    </div>
  </li>
  <li>Run the following to update the grub:
    <div class="language-bash highlighter-rouge"><div class="highlight"><pre class="highlight"><code> update-grubb
</code></pre></div>    </div>
  </li>
</ol>

<h3 id="congratulations">Congratulations</h3>
<p>You have completed this historical configuration walkthrough. Treat the result as a starting point for validation, not evidence of NIST SP 800-171 compliance.</p>]]></content><author><name>Ryan Adamczyk</name><email>me@ryanadamczyk.com</email></author><category term="Security" /><category term="Linux" /><category term="ubuntu" /><category term="nist-800-171" /><category term="security" /><category term="compliance" /><category term="hardening" /><summary type="html"><![CDATA[A guide to hardening Ubuntu 20.04 LTS for NIST 800-171 compliance, including SCAP scans and DoD STIG fixes.]]></summary></entry><entry><title type="html">RT5 Installation Part 2 - Request Tracker Installation and Configuration</title><link href="https://www.radamczyk.com/2023-07-28/rt5-installation-part-1-request-tracker-installation-and-configuration" rel="alternate" type="text/html" title="RT5 Installation Part 2 - Request Tracker Installation and Configuration" /><published>2023-07-28T21:35:00+00:00</published><updated>2023-07-28T21:35:00+00:00</updated><id>https://www.radamczyk.com/2023-07-28/rt5-installation-part-1-request-tracker-installation-and-configuration</id><content type="html" xml:base="https://www.radamczyk.com/2023-07-28/rt5-installation-part-1-request-tracker-installation-and-configuration"><![CDATA[<blockquote class="post-notice">
  <p><strong>Historical reference:</strong> This 2023 walkthrough documents a specific RT 5.0.4 deployment path. Package repositories and security guidance have changed; review the current <a href="https://docs.bestpractical.com/rt/latest/">Request Tracker documentation</a> before attempting an installation.</p>
</blockquote>

<h2 id="request-tracker">Request Tracker</h2>
<p>RT is an enterprise-grade issue tracking system. It allows organizations
to keep track of what needs to get done, who is working on which tasks,
what’s already been done, and when tasks were (or weren’t) completed.</p>

<h2 id="preface">Preface</h2>
<p>Previously we learned how to update our OS, install and configure our database, and ensure we have all dependencies needed for the installation of Request Tracker. For my installation I am using CentOS Stream 9, MySQL 5.7 with InnoDB support, Request Tracker 5.0.4, and Apache 2.</p>

<p>After this tutorial we will have a working installation of Request Tracker 5.0.4 with MySQL 5.7 with InnoDB support. In the last step of this tutorial we will install and configure our web and mail server:</p>

<p><strong>1. Dependencies and Database</strong></p>

<p><strong>2.Request Tracker Installation and Configuration</strong></p>

<p>3.Web and Mail Server Configuration</p>

<h2 id="download-and-install-rt5">Download and install RT5</h2>
<p>First we will download RT 5.0.4.</p>
<div class="language-bash highlighter-rouge"><div class="highlight"><pre class="highlight"><code>wget https://download.bestpractical.com/pub/rt/release/rt-5.0.4.tar.gz
</code></pre></div></div>
<p>Next we will extract the archive</p>
<div class="language-bash highlighter-rouge"><div class="highlight"><pre class="highlight"><code><span class="nb">tar </span>xzvf rt-5.0.4.tar.gz
</code></pre></div></div>
<p>Now we will traverse to our RT directory and install the base pearl dependencies.</p>
<div class="language-bash highlighter-rouge"><div class="highlight"><pre class="highlight"><code><span class="nb">sudo </span>make <span class="nb">dirs
</span>make fixdeps <span class="nv">RT_FIX_DEPS_CMD</span><span class="o">=</span><span class="s2">"cpanm --sudo"</span>
<span class="nb">sudo </span>cpanm DBD::mysql
</code></pre></div></div>
<p>Now we will test our dependencies and install.</p>
<div class="language-bash highlighter-rouge"><div class="highlight"><pre class="highlight"><code><span class="nb">sudo </span>make testdeps
<span class="nb">sudo </span>make <span class="nb">install</span>
</code></pre></div></div>
<h2 id="create-new-database-or-import-old-database-and-upgrade">Create new database, or import old database and upgrade</h2>
<h3 id="new-database">New Database</h3>

<h3 id="import-rt4-database-and-upgrade">Import RT4 database and upgrade</h3>
<p>We will install necessary dependencies, create our rt5 database, and import our old database.</p>
<div class="language-bash highlighter-rouge"><div class="highlight"><pre class="highlight"><code><span class="nb">sudo </span>yum <span class="nb">install </span>cifs-utils
mysql <span class="nt">-uroot</span> <span class="nt">-p</span>

CREATE DATABASE rt5<span class="p">;</span>
quit<span class="p">;</span>

<span class="nb">gunzip</span> <span class="nt">-c</span> rt-olddatabase-name.sql.gz | mysql <span class="nt">-uroot</span> <span class="nt">-p</span> rt5
</code></pre></div></div>
<p>This will take a while to run, after it is finished run these commands to check that it worked:</p>
<div class="language-bash highlighter-rouge"><div class="highlight"><pre class="highlight"><code>mysql <span class="nt">-uroot</span> <span class="nt">-p</span>

show databases<span class="p">;</span>
use rt5<span class="p">;</span>
show tables<span class="p">;</span>

SELECT 
table_name AS <span class="sb">`</span>Table<span class="sb">`</span>, 
	round<span class="o">(((</span>data_length + index_length<span class="o">)</span> / 1024 / 1024<span class="o">)</span>, 2<span class="o">)</span> <span class="sb">`</span>Size <span class="k">in </span>MB<span class="sb">`</span> 
FROM 
	information_schema.TABLES
WHERE 
	table_schema <span class="o">=</span> <span class="s2">"rt5"</span><span class="p">;</span>
</code></pre></div></div>
<p>Now we will navigate to our rt download and run the database upgrade scripts.</p>
<div class="language-bash highlighter-rouge"><div class="highlight"><pre class="highlight"><code><span class="nb">cd</span> ~
<span class="nb">cd </span>rt-5.0.4
<span class="nb">sudo </span>make upgrade
<span class="nb">sudo </span>make upgrade-database
</code></pre></div></div>
<p>After running upgrade-database click space twice, this step will take a while depending on the size of the database you are upgrading.</p>
<div class="language-bash highlighter-rouge"><div class="highlight"><pre class="highlight"><code><span class="nb">sudo rm</span> <span class="nt">-rf</span> /opt/rt5/var/mason_data/obj
</code></pre></div></div>
<h2 id="configure-rt5">Configure RT5</h2>
<p>Now we will configure RT5 for our own purposes.</p>
<div class="language-bash highlighter-rouge"><div class="highlight"><pre class="highlight"><code><span class="nb">sudo </span>nano /opt/rt5/etc/RT_SiteConfig.pm
</code></pre></div></div>
<div class="language-bash highlighter-rouge"><div class="highlight"><pre class="highlight"><code><span class="nb">sudo </span>cpan <span class="nb">install </span>Net::LDAP
<span class="nb">sudo</span> /opt/rt5/sbin/rt-setup-fulltext-index <span class="nt">--noask</span>
</code></pre></div></div>
<p>The end of the process will output some RT configuration that looks like this:</p>
<div class="language-bash highlighter-rouge"><div class="highlight"><pre class="highlight"><code><span class="c">#### EXAMPLE OUTPUT ONLY - Don't use this directly!</span>
		Set<span class="o">(</span> %FullTextSearch,
			Enable     <span class="o">=&gt;</span> 1,
			Indexed    <span class="o">=&gt;</span> 1,
			<span class="c"># Additional output from rt-setup-fulltext-index should be here.</span>
			<span class="c"># The configuration varies by database type.</span>
            <span class="o">)</span><span class="p">;</span>
</code></pre></div></div>
<p>Copy the output generated when you run rt-setup-fulltext-index and save it to the file /opt/rt5/etc/RT_SiteConfig.pm</p>
<div class="language-bash highlighter-rouge"><div class="highlight"><pre class="highlight"><code><span class="nb">cd</span> ~
<span class="nb">cd </span>rt- 5.0.4
<span class="nb">sudo </span>make fixperms
</code></pre></div></div>
<p>This completes part 2 of the tutorial, in the next section we will install and configure our web and mail servers.</p>]]></content><author><name>Ryan Adamczyk</name><email>me@ryanadamczyk.com</email></author><category term="Request Tracker" /><category term="Linux" /><category term="rt5" /><category term="centos" /><category term="sysadmin" /><category term="perl" /><summary type="html"><![CDATA[Part 2 of the Request Tracker 5 installation guide. Configuring the RT5 application and database connection.]]></summary></entry><entry><title type="html">RT5 Installation Part 1 - Dependencies and Database</title><link href="https://www.radamczyk.com/2023-07-26/request-tracker-5-install-part-1" rel="alternate" type="text/html" title="RT5 Installation Part 1 - Dependencies and Database" /><published>2023-07-26T15:40:00+00:00</published><updated>2023-07-26T15:40:00+00:00</updated><id>https://www.radamczyk.com/2023-07-26/request-tracker-5-install-part-1</id><content type="html" xml:base="https://www.radamczyk.com/2023-07-26/request-tracker-5-install-part-1"><![CDATA[<blockquote class="post-notice">
  <p><strong>Historical reference:</strong> This 2023 walkthrough documents a specific RT 5.0.4 deployment path. Package repositories and security guidance have changed; review the current <a href="https://docs.bestpractical.com/rt/latest/">Request Tracker documentation</a> before attempting an installation.</p>
</blockquote>

<h2 id="request-tracker">Request Tracker</h2>
<p>RT is an enterprise-grade issue tracking system. It allows organizations
to keep track of what needs to get done, who is working on which tasks,
what’s already been done, and when tasks were (or weren’t) completed.</p>

<h2 id="background">Background</h2>
<p>I work for Florida Atlantic University and was given a project to upgrade our Request Tracker software. Previously we were running RT 4.4.1 on a CentOS Stream 7 virtual machine. I upgraded us to RT 5.0.4 running on a CentOS Stream 9 VM. Throughout this process documentation on the internet was very slim, therefore I documented all steps I took to provide a guide for others in the future who wish to do a similar install.</p>

<p>For the purposes of this tutorial I will be assuming that you are running CentOS Stream 9, or a similar RHEL distribution.</p>

<p>I will also be splitting the tutorial into three parts:</p>
<ol>
  <li>Dependencies and Database</li>
  <li>Request Tracker Installation and Configuration</li>
  <li>Web and Mail Server Configuration</li>
</ol>

<h2 id="preface">Preface</h2>
<p>If you are upgrading from an existing installation of RT it is important to backup the existing database properly. This is done by running the following command:</p>

<div class="language-bash highlighter-rouge"><div class="highlight"><pre class="highlight"><code><span class="o">(</span> mysqldump <span class="nt">-p</span> <span class="nt">--default-character-set</span><span class="o">=</span>utf8mb4 rt4 <span class="nt">--tables</span> sessions <span class="nt">--no-data</span> <span class="nt">--single-transaction</span><span class="p">;</span> <span class="se">\</span>
  mysqldump <span class="nt">-p</span> <span class="nt">--default-character-set</span><span class="o">=</span>utf8mb4 rt4 <span class="nt">--ignore-table</span><span class="o">=</span>rt4.sessions <span class="nt">--single-transaction</span> <span class="o">)</span> <span class="se">\</span>
    | <span class="nb">gzip</span> <span class="o">&gt;</span> rt-<span class="sb">`</span><span class="nb">date</span> +%Y%m%d<span class="sb">`</span>.sql.gz
</code></pre></div></div>

<h2 id="upgrade-and-install-dependencies">Upgrade and Install Dependencies</h2>
<div class="language-bash highlighter-rouge"><div class="highlight"><pre class="highlight"><code><span class="nb">sudo </span>yum update <span class="o">&amp;&amp;</span> upgrade
<span class="nb">sudo </span>yum <span class="nb">install </span>epel-release
<span class="nb">sudo </span>yum <span class="nb">install </span>patch <span class="nb">tar </span>which gcc gcc-c++ perl-core perl-App-cpanminus graphviz expat-devel gd-devel multiwatch openssl openssl-devel w3m
</code></pre></div></div>

<p>Being that we are running RT on CentOS, it is important to disable SELINUX for this installation to work</p>
<div class="language-bash highlighter-rouge"><div class="highlight"><pre class="highlight"><code><span class="nb">sudo sed</span> <span class="nt">-i</span>~ <span class="s1">'/^SELINUX=/ c SELINUX=disabled'</span> /etc/selinux/config
<span class="nb">sudo </span>setenforce 0
</code></pre></div></div>

<h2 id="install-database">Install Database</h2>
<p>For my installation I went with MySQL, however you can use any other preferred database for this step.</p>

<div class="language-bash highlighter-rouge"><div class="highlight"><pre class="highlight"><code>wget https://dev.mysql.com/get/mysql57-community-release-el7-11.noarch.rpm
<span class="nb">sudo </span>yum localinstall mysql57-community-release-el7-11.noarch.rpm
<span class="nb">sudo </span>yum <span class="nb">install </span>mysql-community-server <span class="nt">--nogpgcheck</span>
<span class="nb">sudo </span>yum <span class="nb">install</span> <span class="nt">--nogpgcheck</span> mysql-community-devel
</code></pre></div></div>

<div class="language-bash highlighter-rouge"><div class="highlight"><pre class="highlight"><code><span class="nb">sudo </span>systemctl start mysqld
<span class="nb">sudo </span>systemctl <span class="nb">enable </span>mysqld
<span class="nb">sudo grep</span> <span class="s1">'temporary password'</span> /var/log/mysqld.log
<span class="nb">sudo </span>mysql_secure_installation <span class="nt">-p</span>
</code></pre></div></div>

<p>Next we must configure MySQL by editing the my.cnf file.</p>

<div class="language-bash highlighter-rouge"><div class="highlight"><pre class="highlight"><code><span class="nb">sudo </span>nano /etc/my.cnf
</code></pre></div></div>

<p>Inside the my.cnf file paste the following:</p>
<div class="language-plaintext highlighter-rouge"><div class="highlight"><pre class="highlight"><code>[mysqld]
max_allowed_packet =64M
wait_timeout = 6000
innodb_log_file_size = 64M
character-set-server = utf8mb4
#
# Remove leading # and set to the amount of RAM for the most important data
# cache in MySQL. Start at 70% of total RAM for dedicated server, else 10%.
# innodb_buffer_pool_size = 128M
#
# Remove leading # to turn on a very important data integrity option: logging
# changes to the binary log between backups.
# log_bin
#
# Remove leading # to set options mainly useful for reporting servers.
# The server defaults are faster for transactions and fast SELECTs.
# Adjust sizes as needed, experiment to find the optimal values.
# join_buffer_size = 128M
# sort_buffer_size = 2M
# read_rnd_buffer_size = 2M
datadir=/var/lib/mysql
socket=/var/lib/mysql/mysql.sock

# Disabling symbolic-links is recommended to prevent assorted security risks
symbolic-links=0

[client]
default-character-set = utf8mb4

[mysqld_safe]
log-error=/var/log/mysqld.log
pid-file=/var/run/mysqld/mysqld.pid

[mysqldump]
max_allowed_packet = 64M
</code></pre></div></div>

<p>After editing and saving the my.cnf configuration file you must restart the MySQL server.</p>
<div class="language-bash highlighter-rouge"><div class="highlight"><pre class="highlight"><code><span class="nb">sudo </span>systemctl restart mysqld
</code></pre></div></div>
<p>This completes part 1 of the tutorial, in the next section we will install and configure Request Tracker.</p>]]></content><author><name>Ryan Adamczyk</name><email>me@ryanadamczyk.com</email></author><category term="Request Tracker" /><category term="Linux" /><category term="rt5" /><category term="centos" /><category term="mysql" /><category term="sysadmin" /><summary type="html"><![CDATA[A step-by-step guide to installing Request Tracker 5 on CentOS Stream 9. Part 1 covers dependencies and database setup.]]></summary></entry></feed>